1. Introduction
IPU workloads require access to the RDMA network interface but this is not available by default in Kubernetes. One quick workaround is to run a Pod in privileged mode with access to a host network. This is not an acceptable solution for a production environment, for various reasons.
This document describes how to configure a Kubernetes cluster to use MACVLAN to avoid this workaround. MACVLAN is a virtual LAN that you can use to assign several IP addresses to the same network interface.
Access to the RDMA interface is made available as a secondary network thanks to the Multus plugin and the NVidia Network Operator.
2. Overview
This document describes how to install and configure a Kubernetes cluster where:
A Kubernetes node is running on the Poplar server
Pods running on this node can access the RDMA NIC that provides access to IPU-Machines
It doesn’t use the host network and privileged mode in Pods
It uses MACVLAN to access RDMA NIC
The following components need to be installed and configured, as described in the following sections:
-
If you are using the Gcore Cloud service and want to configure a private network, follow the steps in Section 3, Gcore network settings, otherwise you can skip that section.
-
We have tested with Kubernetes versions 1.24 and 1.25
-
This requires Mellanox driver version 5
Install the NVidia Network Operator
This includes Multus, Whereabouts and some NVidia and Mellanox Kubernetes extensions
The Graphcore Kubernetes IPU Operator will also need to be installed, if it isn’t already, to test that workloads can run and get access to RDMA. The IPU Operator needs to be configured to run worker Pods without a host network. See Section 8.3, Using the IPU operator.
3. Gcore network settings
If you are using the Gcore Cloud service and want to configure a private network, then you need to configure the network as described below.
In the Gcore Cloud portal, when creating a new AI cluster open Network settings and select Private network. Then click Add a new network.
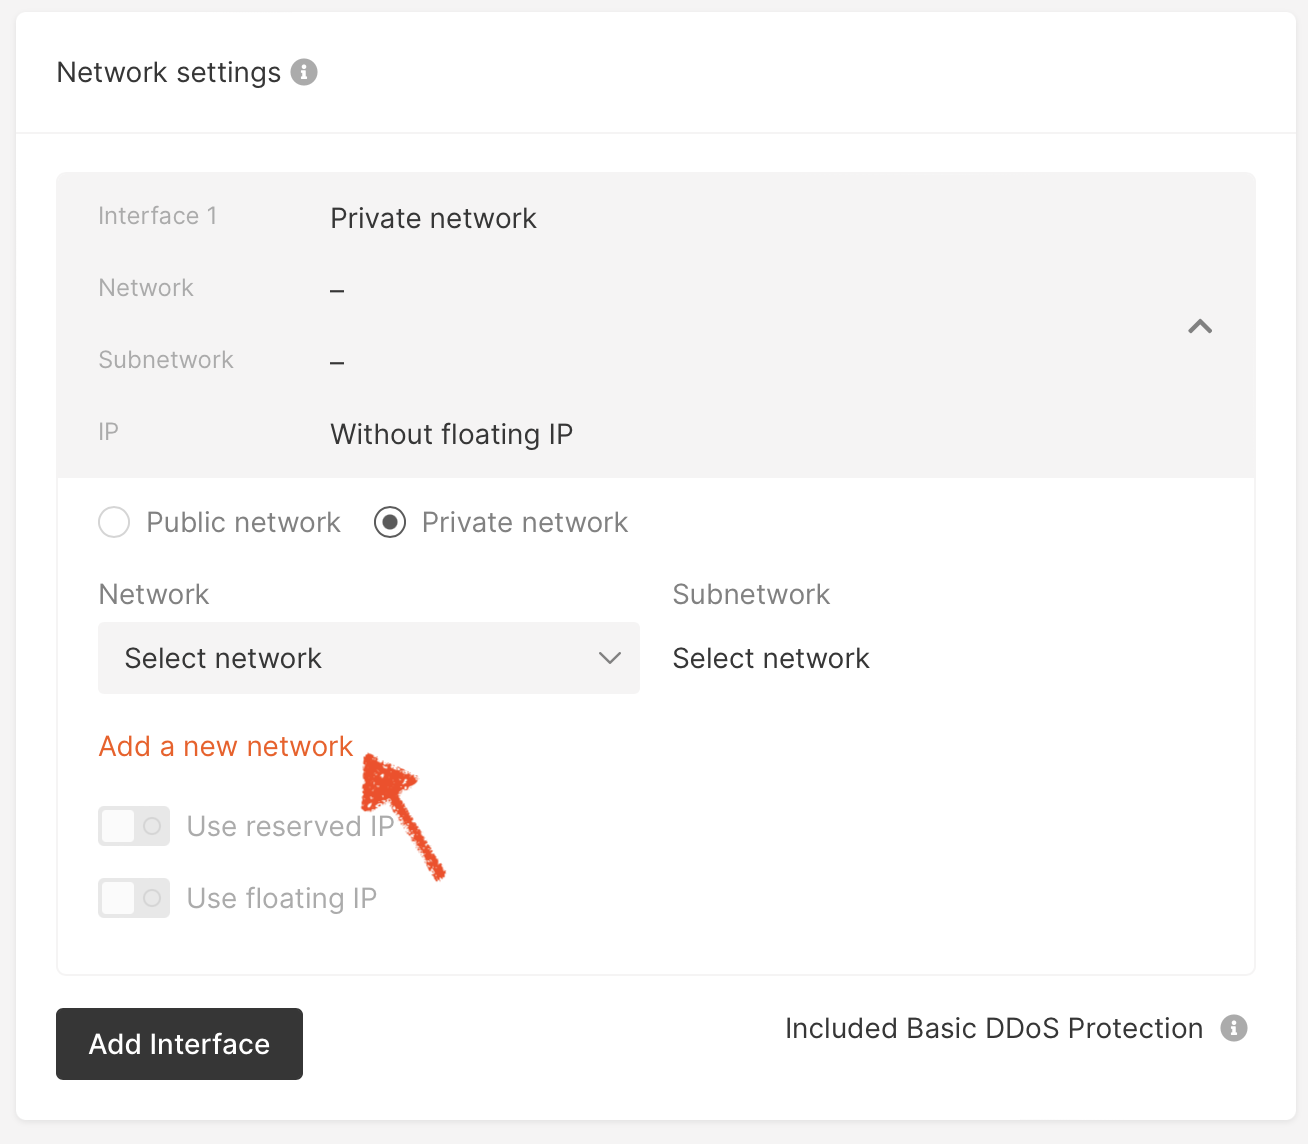
Fig. 3.1 Adding a new private network
In the Create network dialog, enter a name for your private network and select Baremetal Network.

Fig. 3.2 Creating a network
The next step is to create a subnetwork. Click on Add a new subnetwork. In the Create Subnetwork dialog, enter a name and CIDR for your subnetwork and click Create subnetwork.
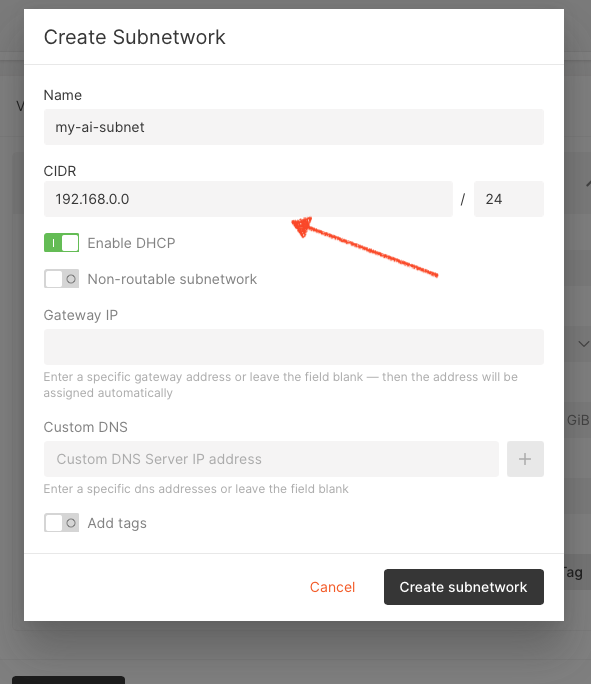
Fig. 3.3 Creating a subnetwork
Finally, complete the process by selecting Use floating IP in the Network settings dialog.
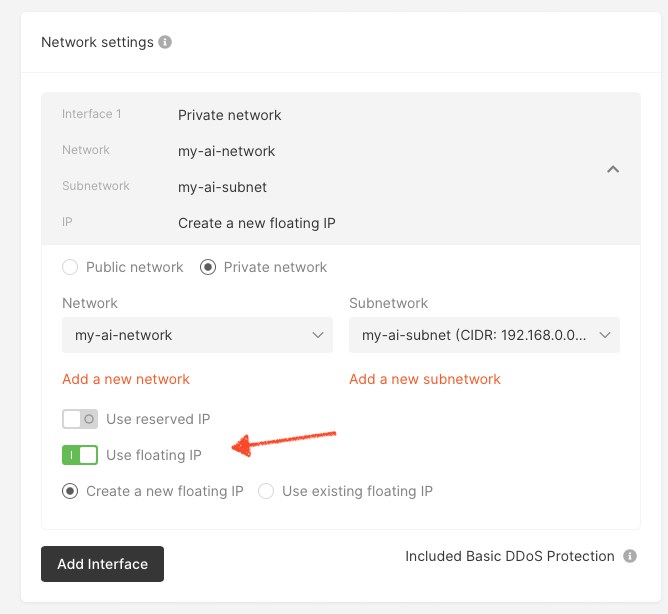
Fig. 3.4 Selecting floating IP
4. Kubernetes installation
Execute the following commands to setup a basic kubernetes cluster:
# this is based on https://computingforgeeks.com/deploy-kubernetes-cluster-on-ubuntu-with-kubeadm/
# https://blog.knoldus.com/how-to-install-kubernetes-on-ubuntu-20-04-kubeadm-and-minikube/

# prepare repos for Kubernetes
sudo apt -y install curl apt-transport-https
curl -s https://packages.cloud.google.com/apt/doc/apt-key.gpg | sudo apt-key add -
echo "deb https://apt.kubernetes.io/ kubernetes-xenial main" | sudo tee /etc/apt/sources.list.d/kubernetes.list

# install Kubernetes
sudo apt update
sudo apt -y install kubelet kubeadm kubectl
sudo apt-mark hold kubelet kubeadm kubectl

# disable swap, probably already off
swapoff -a

# enable kernel modules
modprobe overlay
modprobe br_netfilter

# add some settings to sysctl
sudo tee /etc/sysctl.d/kubernetes.conf<<EOF
net.bridge.bridge-nf-call-ip6tables = 1
net.bridge.bridge-nf-call-iptables = 1
net.ipv4.ip_forward = 1
EOF

# reload sysctl
sudo sysctl --system

# add Docker repo and install its packages
sudo apt install -y gnupg2 software-properties-common apt-transport-https ca-certificates
curl -fsSL https://download.docker.com/linux/ubuntu/gpg | sudo apt-key add -
sudo add-apt-repository "deb [arch=amd64] https://download.docker.com/linux/ubuntu $(lsb_release -cs) stable"
sudo apt update
sudo apt install -y containerd.io docker-ce docker-ce-cli

# create required directories
sudo mkdir -p /etc/systemd/system/docker.service.d

# create daemon json config file
sudo tee /etc/docker/daemon.json <<EOF
{
    "exec-opts": ["native.cgroupdriver=systemd"],
    "log-driver": "json-file",
    "log-opts": {
        "max-size": "100m"
    },
    "storage-driver": "overlay2",
}
EOF

# start and enable docker ervices
sudo systemctl daemon-reload
sudo systemctl restart docker
sudo systemctl enable docker

# enable some plugin that is needed for j8s 1.25:
# https://serverfault.com/questions/1074008/containerd-1-4-9-unimplemented-desc-unknown-service-runtime-v1alpha2-runtimese
sudo tee /etc/containerd/config.toml <<EOF
[plugins."io.containerd.grpc.v1.cri"]
    systemd_cgroup = true
EOF
sudo systemctl restart containerd

# enable kubelet service.
sudo systemctl enable kubelet

# pull container images
sudo kubeadm config images pull

# bootstrap a cluster without using DNS endpoint
sudo kubeadm init --pod-network-cidr=192.168.0.0/16

# point path to kube config
mkdir ~/.kube
sudo cat /etc/kubernetes/admin.conf | tee ~/.kube/config

# check status
kubectl cluster-info

# install Calico network plugin
kubectl create -f https://raw.githubusercontent.com/projectcalico/calico/master/manifests/tigera-operator.yaml
kubectl create -f https://raw.githubusercontent.com/projectcalico/calico/master/manifests/custom-resources.yaml  # this file also is using 192.168.0.0/16 as CIDR
kubectl get pods -n calico-system

# confirm master node is ready
kubectl get nodes -o wide
5. Mellanox RDMA NIC setup
Follow the instructions on the NVidia Network Operator page to install the Network Operator.
Note
For Kubernetes version 1.25 or later, use Network Operator version 1.4.0
For Kubernetes version 1.24, use Network Operator version 1.3.0
5.1. Install the NVidia Network Operator
Execute the following commands as a standard user, for example “ubuntu”:
# install Helm
sudo snap install helm --classic

# add nvidia Helm charts repo
helm repo add nvidia https://mellanox.github.io/network-operator
helm repo update

# install NVidia Network Operator
cat > network-operator-values.yaml <<EOF
nfd:
  enabled: true

# NicClusterPolicy CR values:
deployCR: true
ofedDriver:
  deploy: false

rdmaSharedDevicePlugin:
  deploy: true
  resources:
    - name: rdma_shared_device_a
      drivers: ["mlx5_core"]

nvPeerDriver:
  deploy: false

secondaryNetwork:
  deploy: true
  cniPlugins:
    deploy: true
  multus:
    deploy: true
  ipamPlugin:
    deploy: true

# to remove node affinity in multus ds
nodeAffinity:
  preferredDuringSchedulingIgnoredDuringExecution:
  - weight: 1
    preference:
      matchExpressions:
      - key: node-role.kubernetes.io/master
        operator: DoesNotExist
      - key: node-role.kubernetes.io/control-plane
        operator: DoesNotExist
EOF

helm install -n network-operator --create-namespace \
  -f network-operator-values.yaml --wait --version 1.4.0 \
  network-operator nvidia/network-operator

# check network operator pods
kubectl -n network-operator get pods
5.2. Configure MACVLAN
If you run everything on one node, then you should remove any NoSchedule taints from the node:
$ kubectl taint node <node-name> node-role.kubernetes.io/control-plane-
Configure MACVLAN as shown in Listing 5.2. You will need to set these fields:
Replace
<RDMA_IFACE>with the name of RDMA interface on the hostReplace
<RDMA_SUBNET_CIDR>with the subnet CIDR in the RDMA network, for example 10.247.208.0/24Populate
RDMA_SUBNET_EXCLUDESwith the CIDR to be excluded from the RDMA subnet, for example [“10.247.208.0/25”]. On GCore all the IPU infrastructure should be in .0/26 (up to Pod128) but to be safe we can exclude first 128 IP addresses of the network (/25).
Or you can use the following commands to do that:
$ sudo apt install -y jq ipcalc
$ VIPU_CTRL_ADDR=$(vipu --server-version --showjson | jq -r '.host')
$ RDMA_IFACE=$(ip -j r g ${VIPU_CTRL_ADDR%:*} | jq -r '.[0].dev')
$ RDMA_SUBNET_CIDR=$(ipcalc -b ${VIPU_CTRL_ADDR%:*} | grep Network | awk '{print $2}')
$ RDMA_SUBNET_NETMASK=$(ipcalc -b ${VIPU_CTRL_ADDR%:*} | grep Netmask | awk '{print $4}')
$ RDMA_EXCLUDES=${RDMA_SUBNET_CIDR/%$RDMA_SUBNET_NETMASK/25}
$ sed -i -e "s|RDMA_IFACE|$RDMA_IFACE|" -e "s|RDMA_SUBNET_CIDR|$RDMA_SUBNET_CIDR|" -e "s|RDMA_SUBNET_EXCLUDES|$RDMA_EXCLUDES|" macvlan_network.yaml
Then apply this configuration:
$ kubectl apply -f macvlan.yaml
apiVersion: mellanox.com/v1alpha1
kind: MacvlanNetwork
metadata:
  name: rdma-net
spec:
  networkNamespace: "default"
  master: "<RDMA_INTERFACE>"
  mode: "bridge"
  mtu: 1500
  ipam: |
    {
      "type": "whereabouts",
      "datastore": "kubernetes",
      "kubernetes": {
        "kubeconfig": "/etc/cni/net.d/whereabouts.d/whereabouts.kubeconfig"
      },
      "log_file" : "/var/log/whereabouts.log",
      "log_level" : "info",
      "range": "RDMA_SUBNET_CIDR",
      "exclude": ["RDMA_SUBNET_EXCLUDES"]
    }
To check this has worked, look in /etc/cni/net.d/ and check that files and folders are present for Multus and Whereabouts.
You should see the file 00-multus.conf and directories multus.d and whereabouts.d:
$ sudo ls -al /etc/cni/net.d/
drwx------ 4 root root 4096 Dec 15 14:13 .
drwx------ 3 root root 4096 Dec 15 12:18 ..
-rw------- 1 root root  861 Dec 15 14:13 00-multus.conf
-rw-r--r-- 1 root root  808 Dec 15 13:39 10-calico.conflist
-rw------- 1 root root 2721 Jan 10 23:33 calico-kubeconfig
drwxr-xr-x 2 root root 4096 Dec 15 14:13 multus.d
drwxr-xr-x 2 root root 4096 Dec 15 14:13 whereabouts.d
6. Test the Pod
Now we can verify that the applied networking configuration can be used. The following Pod definition uses the “rdma-net” network and RDMA resources configured previously.
apiVersion: v1
kind: Pod
metadata:
  name: rdma-test-pod
  annotations:
    k8s.v1.cni.cncf.io/networks: rdma-net
spec:
  containers:
  - image: mellanox/rping-test
    name: rdma-test-ctr
    securityContext:
      capabilities:
        add: [ "IPC_LOCK" ]
    resources:
      limits:
        rdma/rdma_shared_device_a: 1
      requests:
        rdma/rdma_shared_device_a: 1
    command:
    - sh
    - -c
    - sleep infinity
Access the Pod created by this and check that the RDMA interface is present, and how the routing table is looks. For example:
$ kubectl exec -it rdma-test-pod -- bash
$ ip -4 a
1: lo: <LOOPBACK,UP,LOWER_UP> mtu 65536 qdisc noqueue state UNKNOWN group default qlen 1000
    inet 127.0.0.1/8 scope host lo
       valid_lft forever preferred_lft forever
4: eth0@if8260: <BROADCAST,MULTICAST,UP,LOWER_UP> mtu 1480 qdisc noqueue state UP group default  link-netnsid 0
    inet 192.168.34.155/32 scope global eth0
       valid_lft forever preferred_lft forever
5: net1@if9: <BROADCAST,MULTICAST,UP,LOWER_UP> mtu 1500 qdisc noqueue state UP group default  link-netnsid 0
    inet 10.193.242.225/24 brd 10.193.242.255 scope global net1
       valid_lft forever preferred_lft forever
In the Pod, there should be 3 network interfaces:
Loopback
A regular Kubernetes interface, here this is “eth0”
“net1” which is the extra RDMA interface configured by Multus
$ route -n
20.0.0.0         169.254.1.1     0.0.0.0         UG    0      0        0 eth0
310.193.242.0    0.0.0.0         255.255.255.0   U     0      0        0 net1
4169.254.1.1     0.0.0.0         255.255.255.255 UH    0      0        0 eth0
Main traffic goes upstream to the Internet via “eth0”. “net1” is an interface for the RDMA network where IPU-Machines reside.
7. Run jobs as a normal user
To run workloads as a normal user (without root privileges), you need to set LimitMEMLOCK=infinity. See Section 8.2, Kubernetes native examples with IPU (normal user) for examples.
7.1. Setting LimitMEMLOCK for K3s
Note
The solution for setting LimitMEMLOCK for K3s only works with the containerd runtime (default for K3s). It does not work with the Docker runtime.
To set LimitMEMLOCK=infinity in a K3s containerd runtime:
Edit the
/etc/systemd/system/k3s.servicefile.Add
LimitMEMLOCK=infinityunder the[Services]section and save.Run:
$ sudo systemctl daemon-reload
$ sudo systemctl restart k3s
As a normal user, run:
$ ulimit -a
max locked memory (kbytes, -l) unlimited
The output should show unlimited locked memory:
You should now be able to connect to the IPU (for example with
gc-hosttraffictest).
7.2. Setting LimitMEMLOCK for Kubernetes
You can set LimitMEMLOCK=infinity in both containerd and Docker runtimes for Kubernetes.
7.2.1. containerd runtime
To set LimitMEMLOCK=infinity in a containerd Kubernetes runtime, you need to:
Edit the
/etc/systemd/system/containerd.servicefile.Add
LimitMEMLOCK=infinityunder the[Services]section and save.Run:
$ sudo systemctl daemon-reload
$ sudo systemctl restart containerd
As a normal user, run:
$ ulimit -a
max locked memory (kbytes, -l) unlimited
The output should show unlimited locked memory.
You should be able to connect to the IPU (for example with
gc-hosttraffictest).
7.2.2. Docker runtime
To set LimitMEMLOCK=infinity in a Docker Kubernetes runtime, you need to:
Edit the
/usr/lib/systemd/system/docker.servicefile.Add
--default-ulimit memlock=-1:-1at the end of the line starting withExecStart=/usr/bin/and save.Run:
$ dockerd -H fd:// --containerd=/run/containerd/containerd.sock
$ sudo systemctl daemon-reload
$ sudo systemctl restart docker.service
As a normal user, run:
$ ulimit -a
max locked memory (kbytes, -l) unlimited
The output should show unlimited locked memory:
You should be able to connect to the IPU (for example with
gc-hosttraffictest).
8. Usage examples
This chapter shows examples of running IPU workloads.
8.1. Kubernetes native examples with IPU (root privileges)
Note
In these examples, IPUOF_VIPU_API_HOST is set to “localhost”.
However, in general, the value of IPUOF_VIPU_API_HOST is specific to the system being used. It will usually be the IP address or hostname of a remote machine (not “localhost”).
On Gcore systems, the correct value can be determined by looking at the value of the IPUOF_VIPU_API_HOST environment variable on the Gcore host that you log into.
apiVersion: batch/v1
kind: Job
metadata:
  name: simple-training
spec:
  backoffLimit: 1
  template:
    metadata:
      annotations:
        k8s.v1.cni.cncf.io/networks: rdma-net
    spec:
      securityContext:
        runAsUser: 0
      containers:
      - name: mnist-training
        image: graphcore/pytorch-tutorials:latest
        workingDir: "/opt/tutorials/simple_applications/pytorch/mnist"
        command:
        - "bash"
        args:
        - "-c"
        - "pip3 install -r requirements.txt && python3 mnist_poptorch.py --epochs=1"
        env:
        - name: IPUOF_VIPU_API_HOST
          value: "localhost"
        - name: IPUOF_VIPU_API_PORT
          value: "8090"
        - name: IPUOF_VIPU_API_PARTITION_ID
          value: "training_partition"
        securityContext:
          capabilities:
            add: [ "IPC_LOCK" ]
        resources:
          limits:
            rdma/rdma_shared_device_a: 1
          requests:
            rdma/rdma_shared_device_a: 1
      restartPolicy: OnFailure
apiVersion: apps/v1
kind: Deployment
metadata:
  name: simple-inference
spec:
  replicas: 1
  selector:
    matchLabels:
      app: simple-inference
  template:
    metadata:
      annotations:
        k8s.v1.cni.cncf.io/networks: rdma-net
      labels:
        app: simple-inference
    spec:
      securityContext:
        runAsUser: 0
      containers:
      - name: mnist-inference
        image: graphcore/pytorch-tutorials:latest
        command:
          - "sleep"
          - "infinity"
        env:
          - name: IPUOF_VIPU_API_HOST
            value: "localhost"
          - name: IPUOF_VIPU_API_PORT
            value: "8090"
          - name: IPUOF_VIPU_API_PARTITION_ID
            value: "inference_partition"
        securityContext:
          capabilities:
            add: [ "IPC_LOCK" ]
        resources:
          limits:
            rdma/rdma_shared_device_a: 1
          requests:
            rdma/rdma_shared_device_a: 1
8.2. Kubernetes native examples with IPU (normal user)
Refer to Section 7, Run jobs as a normal user for more information about running workloads as a normal (non-root) user.
Note
In these examples, IPUOF_VIPU_API_HOST is set to “localhost”.
However, in general, the value of IPUOF_VIPU_API_HOST is specific to the system being used. It will usually be the IP address or hostname of a remote machine (not “localhost”).
On Gcore systems, the correct value can be determined by looking at the value of the IPUOF_VIPU_API_HOST environment variable on the Gcore host that you log into.
apiVersion: batch/v1
kind: Job
metadata:
  name: simple-training
spec:
  backoffLimit: 1
  template:
    metadata:
      annotations:
        k8s.v1.cni.cncf.io/networks: rdma-net
    spec:
      securityContext:
        runAsUser: 1000
      containers:
      - name: mnist-training
        image: graphcore/pytorch-tutorials:latest
        workingDir: "/opt/tutorials/simple_applications/pytorch/mnist"
        command:
        - "bash"
        args:
        - "-c"
        - "pip3 install -r requirements.txt && python3 mnist_poptorch.py --epochs=1"
        env:
        - name: IPUOF_VIPU_API_HOST
          value: "localhost"
        - name: IPUOF_VIPU_API_PORT
          value: "8090"
        - name: IPUOF_VIPU_API_PARTITION_ID
          value: "training_partition"
        securityContext:
          capabilities:
            add: [ "IPC_LOCK" ]
        resources:
          limits:
            rdma/rdma_shared_device_a: 1
          requests:
            rdma/rdma_shared_device_a: 1
      restartPolicy: OnFailure
apiVersion: apps/v1
kind: Deployment
metadata:
  name: simple-inference
spec:
  replicas: 1
  selector:
    matchLabels:
      app: simple-inference
  template:
    metadata:
      annotations:
        k8s.v1.cni.cncf.io/networks: rdma-net
      labels:
        app: simple-inference
    spec:
      securityContext:
        runAsUser: 1000
      containers:
      - name: mnist-inference
        image: graphcore/pytorch-tutorials:latest
        command:
          - "sleep"
          - "infinity"
        env:
          - name: IPUOF_VIPU_API_HOST
            value: "localhost"
          - name: IPUOF_VIPU_API_PORT
            value: "8090"
          - name: IPUOF_VIPU_API_PARTITION_ID
            value: "inference_partition"
        securityContext:
          capabilities:
            add: [ "IPC_LOCK" ]
        resources:
          limits:
            rdma/rdma_shared_device_a: 1
          requests:
            rdma/rdma_shared_device_a: 1
8.3. Using the IPU operator
We can use the IPU Operator to schedule jobs to IPUs. For more information about the IPU Operator see Kubernetes IPU Operator User Guide.
Prepare a values file for the IPU Operator Helm chart, for example ipu-operator-values.yaml.
global:
  vipuControllers: "<VIPU_SERVER_ADDRESS>:ipunode=true"
worker:
  hostNetwork: false
You will need to replace
<VIPU_SERVER_ADDRESS>with the V-IPU server address. You can find the server address with the commandvipu --server-version. An example, with the server address “10.5.212.116:8090”, is shown below.$ vipu --server-version version: 1.18.0 host: 10.5.212.116:8090
The
hostNetworkmust be disabled (set tofalse) so that the host network will not be used and to avoid privileged mode.
Now install the IPU Operator. Run this as a regular user:
# install IPUJob CRD
$ curl -s https://api.github.com/repos/graphcore/helm-charts/releases/latest | \
  grep -wo "https.*ipujobs.*yaml" | wget -qi -
$ kubectl apply -f graphcore_ai_ipujobs_*.yaml

# install IPU operator
$ helm repo add gc https://helm-charts.graphcore.ai/
$ helm repo update
$ helm install -n ipu-operator --create-namespace --wait --version 1.1.0
  -f ipu-operator-values.yaml ipu-operator gc/ipu-operator
$ for node in $(kubectl get nodes -o name | grep -v control-plane); do \
  kubectl label $node ipunode=true; \
  done
Now let’s try running an IPUJob. Save the code shown in Listing 8.7 and run it:
$ kubectl apply -f ipujob.yaml
ipujob/mnist-training created
Note
The Pod has to be run as user 0. This is required by the RDMA libraries otherwise access to the RDMA device will be rejected.
apiVersion: graphcore.ai/v1alpha1
kind: IPUJob
metadata:
  name: mnist-training
spec:
  # jobInstances defines the number of job instances.
  # More than 1 job instance is usually useful for inference jobs only.
  jobInstances: 1
  # ipusPerJobInstance refers to the number of IPUs required per job instance.
  # A separate IPU partition of this size will be created by the IPU Operator
  # for each job instance.
  ipusPerJobInstance: "1"
  workers:
    template:
      metadata:
        annotations:
          k8s.v1.cni.cncf.io/networks: rdma-net
      spec:
        securityContext:
          runAsUser: 0
        containers:
        - name: mnist-training
          image: graphcore/pytorch-tutorials:latest
          workingDir: "/opt/tutorials/simple_applications/pytorch/mnist"
          command: ["bash"]
          args: ["-c", "pip3 install -r requirements.txt && python3 mnist_poptorch.py --epochs=1"]
          securityContext:
            capabilities:
              add: [ "IPC_LOCK" ]
          resources:
            limits:
              rdma/rdma_shared_device_a: 1
            requests:
              rdma/rdma_shared_device_a: 1
        restartPolicy: Never