19. Keras with IPUs
The Graphcore implementation of Keras includes support for the IPU.
Keras model creation is no different than what you would use if you were
training on other devices. To target the Poplar XLA device, Keras model creation
must be inside the strategy.scope of an IPUStrategy.
For a more practical walkthrough, see this tutorial about using Keras on the IPU from the Graphcore tutorials repository.
19.1. Single IPU models
You can train, evaluate or run inference on single-IPU models through the Keras
APIs as you would with other accelerators, as long as you create the model
inside the scope of an IPUStrategy:
 1import tensorflow as tf
 2from tensorflow.python import ipu
 3
 4import keras
 5from keras.datasets import mnist
 6
 7# Configure the IPU device.
 8config = ipu.config.IPUConfig()
 9config.auto_select_ipus = 1
10config.configure_ipu_system()
11
12
13# Create a simple model.
14def create_model():
15  return keras.Sequential([
16      keras.layers.Flatten(),
17      keras.layers.Dense(256, activation='relu'),
18      keras.layers.Dense(128, activation='relu'),
19      keras.layers.Dense(10)
20  ])
21
22
23# Create a dataset for the model.
24def create_dataset():
25  (x_train, y_train), (_, _) = mnist.load_data()
26  x_train = x_train / 255.0
27
28  train_ds = tf.data.Dataset.from_tensor_slices(
29      (x_train, y_train)).shuffle(10000).batch(32, drop_remainder=True)
30  train_ds = train_ds.map(lambda d, l:
31                          (tf.cast(d, tf.float32), tf.cast(l, tf.int32)))
32
33  return train_ds.repeat().prefetch(16)
34
35
36dataset = create_dataset()
37
38# Create a strategy for execution on the IPU.
39strategy = ipu.ipu_strategy.IPUStrategy()
40with strategy.scope():
41  # Create a Keras model inside the strategy.
42  model = create_model()
43
44  # Compile the model for training.
45  model.compile(
46      loss=keras.losses.SparseCategoricalCrossentropy(),
47      optimizer='rmsprop',
48      metrics=["accuracy"],
49  )
50
51  model.fit(dataset, epochs=2, steps_per_epoch=100)
19.2. Using steps_per_execution
To reduce Python overhead and maximize the performance of your model, pass the
steps_per_execution argument to the compile method. This argument sets the
number of batches processed sequentially by one replica in a single execution
which can greatly improve performance because any overhead between steps is removed,
thus increasing IPU utilization.
Ideally, steps_per_execution is equal to the number of steps your model needs
to run per replica in order to complete one epoch. Note that it is not possible
to fetch intermediate results when steps_per_execution is specified. Model
weights are read on the Python host after all steps are executed on the IPU. If
you need to access model weights during an epoch (for example for saving a
checkpoint), you must set steps_per_execution accordingly.
Note
In order to achieve best performance, steps_per_execution needs to be set
before using fit(), evaluate() and predict(), even if no training
is performed.
Note
To achieve best performance when using pipelining, steps_per_execution
should be set to a significantly larger value than the number of pipeline stages. If
steps_per_execution is too small for pipelining to work, your model will fail
to compile and the minimum value of steps_per_execution will be reported in the
error message.
See the documentation for the compile method for full details.
The example below highlights the usage of steps_per_execution:
 1import tensorflow as tf
 2from tensorflow.python import ipu
 3
 4import keras
 5from keras.datasets import mnist
 6
 7# Configure the IPU device.
 8config = ipu.config.IPUConfig()
 9config.auto_select_ipus = 1
10config.configure_ipu_system()
11
12
13# Create a simple model.
14def create_model():
15  return keras.Sequential([
16      keras.layers.Flatten(),
17      keras.layers.Dense(256, activation='relu'),
18      keras.layers.Dense(128, activation='relu'),
19      keras.layers.Dense(10)
20  ])
21
22
23# Create a dataset for the model.
24def create_dataset():
25  (x_train, y_train), (_, _) = mnist.load_data()
26  x_train = x_train / 255.0
27
28  train_ds = tf.data.Dataset.from_tensor_slices(
29      (x_train, y_train)).shuffle(10000).batch(32, drop_remainder=True)
30  train_ds = train_ds.map(lambda d, l:
31                          (tf.cast(d, tf.float32), tf.cast(l, tf.int32)))
32
33  return train_ds.prefetch(16)
34
35
36dataset = create_dataset()
37
38# Create a strategy for execution on the IPU.
39strategy = ipu.ipu_strategy.IPUStrategy()
40with strategy.scope():
41  # Create a Keras model inside the strategy.
42  model = create_model()
43
44  # Compile the model for training.
45  model.compile(
46      loss=keras.losses.SparseCategoricalCrossentropy(),
47      optimizer='rmsprop',
48      metrics=["accuracy"],
49      # Anything between 2 and the length of the dataset would work,
50      # but the greater `steps_per_execution` the greater the
51      # performance gains.
52      steps_per_execution=dataset.cardinality(),
53  )
54
55  model.fit(dataset, epochs=2)
19.3. Gradient accumulation
When training, gradient accumulation allows us to simulate bigger batch sizes. This is achieved by accumulating the gradients across multiple batches together then performing the weight update.
For example, if we have a model where each step is of batch size 16 and we set
gradient_accumulation_steps_per_replica to 4 then this simulates an input
batch of size 64.
Gradient accumulation can be easily enabled for Keras models created inside of
an IPUStrategy by calling the following methods:
|
|
|
|
|
This method can be used to configure gradient accumulation parameters in
models that do not use pipelining, particularly gradient_accumulation_steps_per_replica
and gradient_accumulation_reduction_method. See the respective API documentation for more
details on these arguments.
For pipelined models, these arguments can be passed to the set_pipelining_options() methods. See
Section 19.4.4, Pipelining options for more details
Note
A step commonly refers to the forward and backward passes, followed by a
weight update. On the IPU, when gradient accumulation is used, a step refers
to the forward and backward passes on a micro batch, but not including the
corresponding weight update (the weight update is only performed every
gradient_accumulation_steps_per_replica steps). The number of weight
update steps per execution is given by the steps_per_execution value the
model was compiled with, divided by
gradient_accumulation_steps_per_replica. An execution, which is a
compiled Poplar program, must have an integer number of weight update
steps, such that all the accumulated gradients are applied.
Therefore, steps_per_execution must be an integer multiple of
gradient_accumulation_steps_per_replica.
Note
The steps per epoch value (steps_per_epoch) applies per replica.
steps_per_epoch needs to be set when using a dataset of
infinite cardinality. An epoch consists of one or more executions. Therefore, if set,
steps_per_epoch must be an integer multiple of steps_per_execution.
Note
Not all operations are compatible with gradient accumulation.
The example below highlights the usage of set_gradient_accumulation_options:
 1import tensorflow as tf
 2from tensorflow.python import ipu
 3
 4import keras
 5from keras.datasets import mnist
 6
 7# Configure the IPU device.
 8config = ipu.config.IPUConfig()
 9config.auto_select_ipus = 1
10config.configure_ipu_system()
11
12
13# Create a simple model.
14def create_model():
15  return keras.Sequential([
16      keras.layers.Flatten(),
17      keras.layers.Dense(256, activation='relu'),
18      keras.layers.Dense(128, activation='relu'),
19      keras.layers.Dense(10)
20  ])
21
22
23# Create a dataset for the model.
24def create_dataset():
25  (x_train, y_train), (_, _) = mnist.load_data()
26  x_train = x_train / 255.0
27
28  train_ds = tf.data.Dataset.from_tensor_slices(
29      (x_train, y_train)).shuffle(10000).batch(32, drop_remainder=True)
30  train_ds = train_ds.map(lambda d, l:
31                          (tf.cast(d, tf.float32), tf.cast(l, tf.int32)))
32
33  return train_ds.prefetch(16)
34
35
36dataset = create_dataset()
37
38# Create a strategy for execution on the IPU.
39strategy = ipu.ipu_strategy.IPUStrategy()
40with strategy.scope():
41  # Create a Keras model inside the strategy.
42  model = create_model()
43
44  # `steps_per_execution` must be divisible by `gradient_accumulation_steps_per_replica`.
45  # Say we want to accumulate 10 steps before doing a weight update, then we would end up
46  # with the following values.
47  gradient_accumulation_steps_per_replica = 10
48  number_of_accumulated_steps = dataset.cardinality(
49  ) // gradient_accumulation_steps_per_replica
50
51  # In order to get the proper `steps_per_execution` value, we have to multiply
52  # `number_of_accumulated_steps` with `gradient_accumulation_steps_per_replica`.
53  steps_per_execution = number_of_accumulated_steps * \
54                        gradient_accumulation_steps_per_replica
55
56  # Now we need to truncate the dataset so Keras will not try to take more data
57  # from the dataset than is available.
58  dataset = dataset.take(steps_per_execution)
59
60  # Compile the model for training.
61  model.compile(
62      loss=keras.losses.SparseCategoricalCrossentropy(),
63      optimizer='rmsprop',
64      metrics=["accuracy"],
65      steps_per_execution=steps_per_execution,
66  )
67
68  model.set_gradient_accumulation_options(
69      gradient_accumulation_steps_per_replica=10)
70
71  model.fit(dataset, epochs=2)
19.4. Model parallelism
The models described so far occupy a single IPU device, however some models might require the model layers to be split across multiple IPU devices to achieve high compute efficiency.
One method to achieve model parallelism is called pipelining, where the model layers are assigned to pipeline stages. Each pipeline stage can be assigned to a different device and different devices can execute in parallel.
By default, these pipeline stages will be executed using the grouped schedule (Fig. 19.1), where the forward and backward stages are grouped together on each IPU. All IPUs alternate between executing a forward pass and then a backward pass.
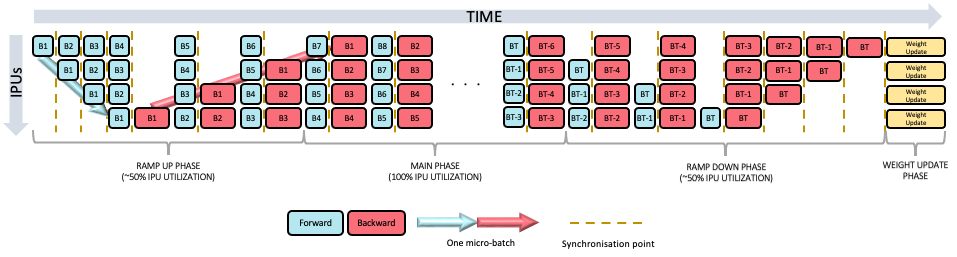
Fig. 19.1 Grouped pipeline
Two other schedules are available and can be configured as shown in Section 19.4.4, Pipelining options. When using the interleaved schedule (Fig. 19.2) the forward and backward passes are interleaved (which requires less memory but is likely to be slower). The sequential schedule (Fig. 19.3) executes one stage at a time and may be useful when debugging your model.
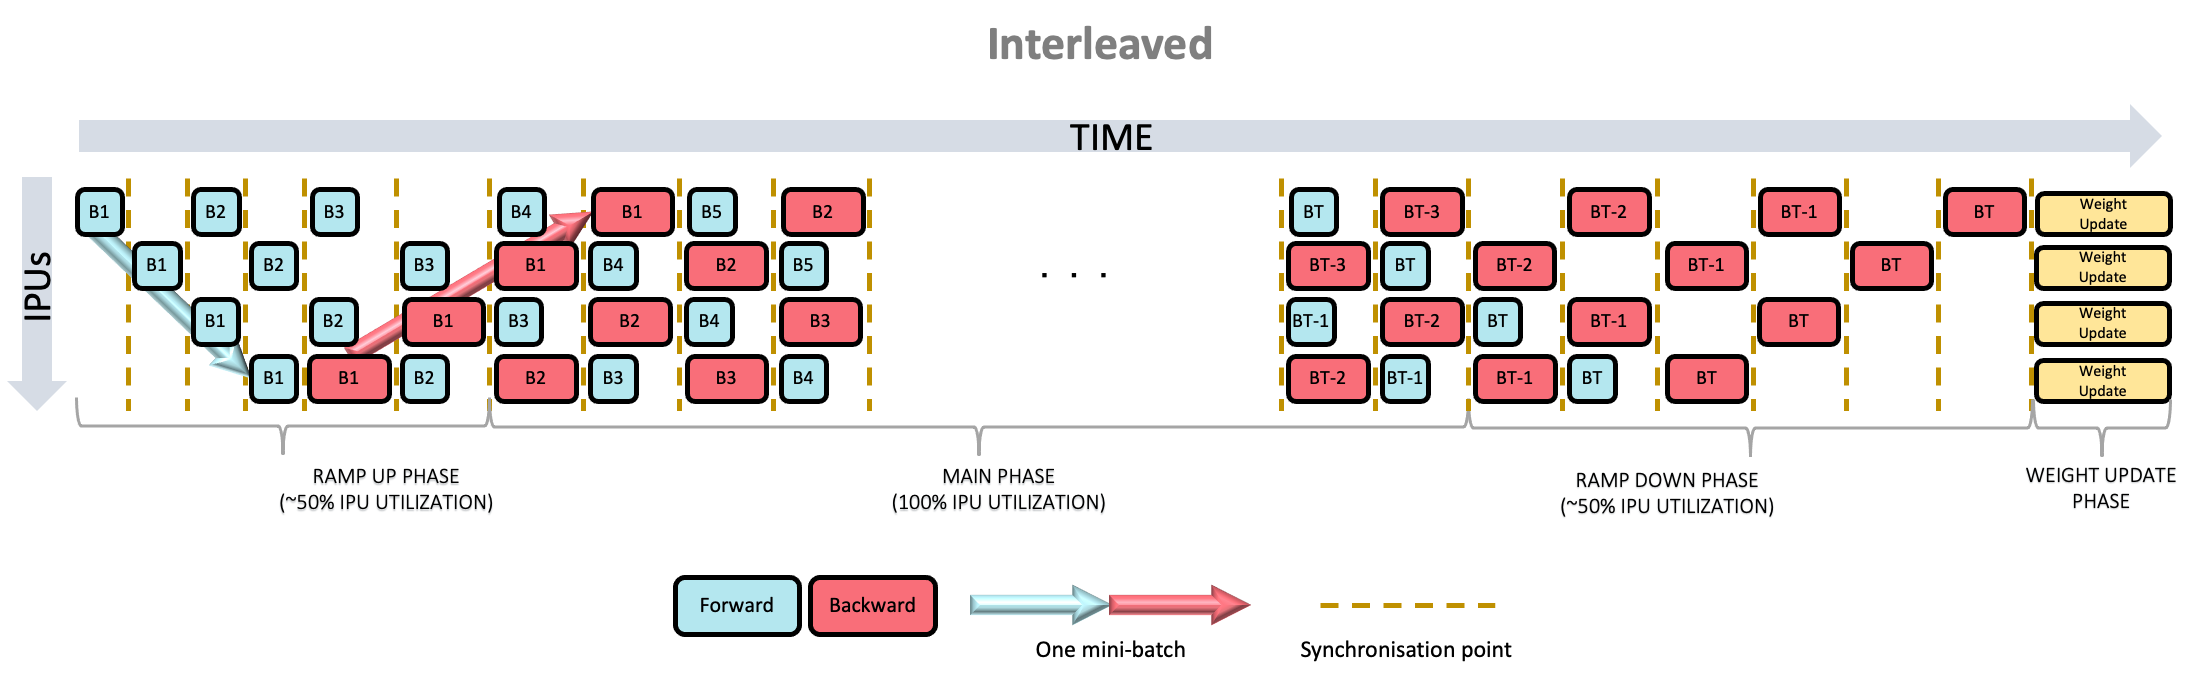
Fig. 19.2 Interleaved pipeline
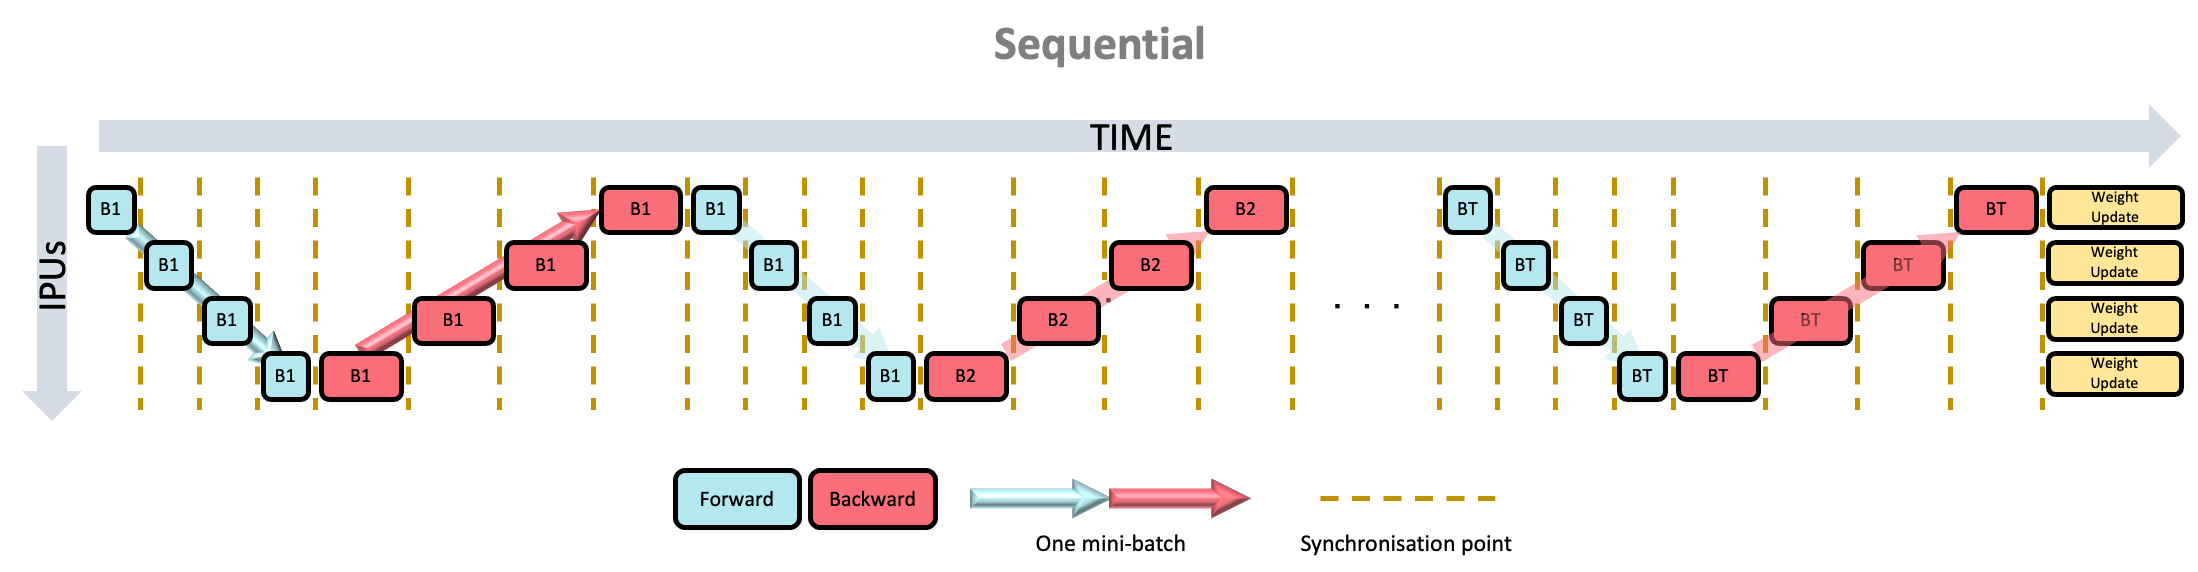
Fig. 19.3 Sequential pipeline
A detailed explanation of pipelining can be found in the technical note on Model parallelism with TensorFlow: sharding and pipelining.
Recomputation of activations can be enabled to reduce memory usage. See Section 6.6, Recomputation for further details on when and how to use it.
The method to pipeline your model depends on whether your model is a
Sequential model, a Functional model, or is subclassed from the Model
class.
19.4.1. Sequential model
Enabling pipelining for a Sequential model requires assigning each layer in
the model to a pipeline stage, by calling
set_pipeline_stage_assignment().
If your model does not contain any nested Keras models, a simple overload of
set_pipeline_stage_assignment()
can be used which accepts a list of integers. The integers in the list
correspond to the layers in the model, each specifying which pipeline stage the
corresponding layer is assigned to.
For example, a simple four layer Sequential model could be assigned to two
different pipeline stages as follows:
1  model = keras.Sequential([
2      keras.layers.Dense(8),  # Pipeline stage 0.
3      keras.layers.Dense(16),  # Pipeline stage 0.
4      keras.layers.Dense(16),  # Pipeline stage 1.
5      keras.layers.Dense(1),  # Pipeline stage 1.
6  ])
7
8  model.set_pipeline_stage_assignment([0, 0, 1, 1])
You can confirm which layers are assigned to which stages using the
print_pipeline_stage_assignment_summary()
method of the model.
Pipelining a model containing nested models
If your Sequential model contains nested Keras models, you can use
get_pipeline_stage_assignment().
This returns a list of pipeline stage assignment objects, corresponding to the
layers in the model, which you can inspect and modify.
Each layer in the model has an associated
SequentialLayerPipelineStageAssignment
object, which indicates what pipeline stage that layer is assigned to.
Each nested Keras model in the model has an associated
SequentialNestedModelPipelineStageAssignment
containing a list of pipeline stage assignments which you can inspect and
modify.
Once you are done modifying the stage assignments, you can pass them to
set_pipeline_stage_assignment()
to set them on the model. Pipeline stage assignments for nested Keras models
will NOT be recursively set on each nested Keras model. The assignments are
all stored on the root model (the model on which
set_pipeline_stage_assignment()
was called) and they are only used when calling fit(), predict(), or
evaluate() on that model.
19.4.2. Functional model
There are two ways to enable IPU pipelining for a Functional model (an
instance of keras.Model) depending on if you’re pipelining a model
you are writing yourself or an existing model.
Pipelining a model you are writing yourself
To pipeline a Functional model you are writing yourself, each layer call
must happen within the scope of an keras.ipu.PipelineStage context.
For example, a simple four layer Functional model could be assigned to two
different pipeline stages as follows:
 1  input_layer = keras.layers.Input((28, 28))
 2
 3  with keras.ipu.PipelineStage(0):
 4    x = keras.layers.Dense(8)(input_layer)
 5    x = keras.layers.Dense(16)(x)
 6
 7  with keras.ipu.PipelineStage(1):
 8    x = keras.layers.Dense(16)(x)
 9    x = keras.layers.Dense(1)(x)
10
11  model = keras.Model(inputs=input_layer, outputs=x)
Note
Layers constructed within a PipelineStage context will have that
pipeline stage assigned to all invocations of the layer. These assignments are
overridden if the layer calls happen within a different
PipelineStage context.
Pipelining an existing functional model
To pipeline an existing Functional model, you can use
get_pipeline_stage_assignment().
This returns a list of pipeline stage assignment objects, corresponding to each
invocation in the model which you can inspect and modify. Note that the list is
in post-order, which means the assignments are returned in the order they will
be executed.
Each layer invocation in the model has an associated
FunctionalLayerPipelineStageAssignment
object, which indicates what pipeline stage that invocation is assigned to.
Each nested Keras model invocation in the model has an associated
FunctionalNestedModelPipelineStageAssignment
containing a list of pipeline stage assignments which you can inspect and modify.
Once you are done modifying the stage assignments, you can pass them to
set_pipeline_stage_assignment()
to set them on the model. Pipeline stage assignments for nested Keras models
will NOT be recursively set on each nested Keras model. The assignments are
all stored on the root model (the model on which
set_pipeline_stage_assignment()
was called) and they are only used when calling fit(), predict(), or
evaluate() on that model.
For example, a naive way of pipelining ResNet50 would be to assign everything up until the “conv4_block2_add” layer invocation to the first stage, then everything else to the second stage, as follows:
 1strategy = ipu.ipu_strategy.IPUStrategy()
 2with strategy.scope():
 3
 4  model = resnet.ResNet50(weights='imagenet')
 5
 6  # Get the individual assignments - note that they are returned in post-order.
 7  assignments = model.get_pipeline_stage_assignment()
 8
 9  # Iterate over them and set their pipeline stages.
10  stage_id = 0
11  for assignment in assignments:
12    assignment.pipeline_stage = stage_id
13    # Split the model on the `conv4_block2_add` layer.
14    if assignment.layer.name.startswith("conv4_block2_add"):
15      stage_id = 1
16
17  # Set the assignments to the model.
18  model.set_pipeline_stage_assignment(assignments)
19
20  model.print_pipeline_stage_assignment_summary()
Note
You can use print_pipeline_stage_assignment_summary()
to print the pipeline stage assignments of the model’s layer invocations.
Note
This method of assigning pipeline stages can also be used with Functional
models you are writing yourself, as well as with Sequential
models and Model subclasses using the
SequentialExtension and
ModelExtension
equivalents.
19.4.3. Model subclass
Model subclasses are subclasses of keras.Model, which override the call
method. There are two ways to enable IPU pipelining for an instance of a
Model subclass, depending on if you’re pipelining a model you are writing
yourself or an existing model. These are very similar to the methods available
for Functional models.
Note that the following Model methods cannot be overridden:
train_stepmake_train_functiontest_stepmake_test_functionpredict_stepmake_predict_function
Pipelining a model you are writing yourself
To pipeline a Model subclass you are writing yourself, each layer call
must happen within the scope of an keras.ipu.PipelineStage context.
For example, a simple four layer Model subclass could be assigned to four
different pipeline stages as follows:
 1class MyModel(keras.Model):
 2  def __init__(self):
 3    super().__init__(self)
 4    self.dense_layer_1 = keras.layers.Dense(8)
 5    self.dense_layer_2 = keras.layers.Dense(8)
 6    self.concat_layer = keras.layers.Concatenate()
 7    self.dense_layer_3 = keras.layers.Dense(1)
 8
 9  def call(self, inputs):
10    # Invoke layers inside PipelineStage scopes to assign the layer invocations
11    # to the specified pipeline stage.
12    with keras.ipu.PipelineStage(0):
13      x = self.dense_layer_1(inputs)
14    with keras.ipu.PipelineStage(1):
15      x1 = self.dense_layer_2(x)
16      x2 = self.dense_layer_2(x)
17    with keras.ipu.PipelineStage(2):
18      x1 = self.dense_layer_2(x1)
19      x2 = self.dense_layer_2(x2)
20      x = self.concat_layer([x1, x2])
21    with keras.ipu.PipelineStage(3):
22      x = self.dense_layer_3(x)
23
24    return x
Note
Layers constructed within a PipelineStage context will have that
pipeline stage assigned to all invocations of the layer. These assignments are
overridden if the layer calls happen within a different
PipelineStage context.
Pipelining an existing model
To pipeline an existing Model subclass, you must use
get_pipeline_stage_assignment().
This returns a list of pipeline stage assignment objects, corresponding to each
invocation in the model which you can inspect and modify. Note that the list is
in post-order, which means the assignments are returned in the order they will
be executed.
Each layer invocation in the model has an associated
ModelLayerPipelineStageAssignment
object, which indicates what pipeline stage that invocation is assigned to.
Each nested Keras model invocation in the model has an associated
NestedModelPipelineStageAssignment containing a list of
pipeline stage assignments which you can inspect and modify.
Once you are done modifying the stage assignments, you can pass them to
set_pipeline_stage_assignment()
to set them on the model. Pipeline stage assignments for nested Keras models
will NOT be recursively set on each nested Keras model. The assignments are
all stored on the root model (the model on which
set_pipeline_stage_assignment()
was called) and they are only used when calling fit(), predict(), or
evaluate() on that model.
Before you can get or set pipeline stage assignments, you must first call
keras.Model.build() on your model, specifying the input shapes.
This traces the model’s call function using the shapes specified. The resulting
graph is what will be used for pipelined execution. You can update the graph by
calling build again, though this will invalidate existing pipeline stage
assignments if the structure of the updated graph is different.
Note
If you need to specify input dtypes when calling keras.Model.build(),
you can pass in keras.Input objects instead of plain shapes.
For example, an existing Model subclass with four layers, could be assigned
to four different pipeline stages as follows:
 1  model = ExistingModel()
 2
 3  # Call build to trace the graph generated by the call function.
 4  # This step is required before getting or setting pipeline stage assignments.
 5  model.build((28, 28))
 6
 7  # Get a blank set of pipeline stage assignments.
 8  assignments = model.get_pipeline_stage_assignment()
 9
10  # Modify the assignments by setting pipline stages.
11  for assignment in assignments:
12    if assignment.layer == model.dense_layer_1:
13      assignment.pipeline_stage = 0
14    elif assignment.layer == model.dense_layer_2 and assignment.node_index < 2:
15      assignment.pipeline_stage = 1
16    elif assignment.layer == model.dense_layer_2 and assignment.node_index < 4:
17      assignment.pipeline_stage = 2
18    elif assignment.layer == model.concat_layer:
19      assignment.pipeline_stage = 2
20    elif assignment.layer == model.dense_layer_3:
21      assignment.pipeline_stage = 3
22
23  # Apply the modified assignments back to the model.
24  model.set_pipeline_stage_assignment(assignments)
Note
You can use print_pipeline_stage_assignment_summary()
to print the pipeline stage assignments of the model’s layer invocations.
Note
This method of assigning pipeline stages can also be used with Model
subclasses you are writing yourself, as well as with Functional and
Sequential models using the
SequentialExtension and
FunctionalExtension
equivalents.
19.4.4. Pipelining options
Pipelining options can be set with the following methods:
|
|
|
|
|
See the respective API documentation for more details.
Gradient accumulation is always used when training a pipelined model (unless using the Sequential schedule). This means
that you must set the option gradient_accumulation_steps_per_replica using this API when using the Grouped or
Interleaved schedule. It is optional when using the Sequential schedule.
The API documentation for set_pipelining_options explains that the
additional keyword arguments (pipelining_kwargs) will be forwarded to the
tensorflow.python.ipu.pipelining_ops.pipeline() operator
(which is used internally - see Section 19.11, Implementation details).
Refer to the API documentation for pipeline()
for details about these arguments.
The code sample below illustrates how options can be set with the set_pipelining_options API.
1  model.set_pipelining_options(
2      gradient_accumulation_steps_per_replica=16,
3      pipeline_schedule=ipu.ops.pipelining_ops.PipelineSchedule.Interleaved)
19.5. Automatic data parallelism
IPU TensorFlow supports automatic data parallelism when multiple IPU devices are configured with the system. Automatic data parallelism is achieved by model replication across available IPU devices. The number of times the model is replicated is called the replication factor; higher replication factors allow higher data throughput.
When using replication, gradients are reduced across replicas during training, which has implications for gradient accumulation. For a non replicated model, the effective batch size is the product of the dataset batch size and the number of gradient accumulation steps. In the case of a replication factor greater than one, the effective batch size is additionally scaled by the replication factor according to the following formula:
effective_batch_size = dataset_batch_size * gradient_accumulation_steps_per_replica * num_replicas
Metrics can also be reduced across replicas. This behaviour must be configured
by calling the following methods on your model, and specifying a value for
replicated_metric_reduction_method:
|
|
|
|
|
See the respective API documentation for more details.
19.6. Asynchronous callbacks
IPU TensorFlow supports the use of Callback objects with the Keras APIs,
however there is an important difference to note when specifying
steps_per_execution. In IPU TensorFlow, if steps_per_execution is specified
for your model, then per-batch callback functions will only be invoked every
steps_per_execution steps, which can have the effect of delaying access to
results.
However, IPU TensorFlow also supports asynchronous callbacks by providing a
polling mechanism which allows results to be accessed at the earliest possible
instance. Asynchronous callbacks can be enabled by passing True to the
following methods:
|
|
|
|
|
See the respective API documentation for more details.
19.7. Configuring Infeeds and Outfeed
Keras models created inside of an IPUStrategy scope
automatically create IPUInfeedQueue and
OutfeedQueue data queues for efficiently feeding
data to and from the IPU devices when using fit(), evaluate() and predict().
Instances of IPUInfeedQueue and
OutfeedQueue can be created with optional arguments
which can affect performance of the model.
Use the following methods to configure the
IPUInfeedQueue for your Keras model:
|
|
|
|
|
Use the following methods to configure the OutfeedQueue for your Keras model:
|
|
|
|
|
For example the prefetch_depth parameter of the OutfeedQueue and the
buffer_depth parameter of the OutfeedQueue can be configured as
follows:
 1from tensorflow.python import ipu
 2
 3import keras
 4
 5# Configure the IPU device.
 6config = ipu.config.IPUConfig()
 7config.auto_select_ipus = 1
 8config.configure_ipu_system()
 9
10
11# Create a simple model.
12def create_model():
13  return keras.Sequential([
14      keras.layers.Flatten(),
15      keras.layers.Dense(256, activation='relu'),
16      keras.layers.Dense(128, activation='relu'),
17      keras.layers.Dense(10)
18  ])
19
20
21# Create a strategy for execution on the IPU.
22strategy = ipu.ipu_strategy.IPUStrategy()
23with strategy.scope():
24
25  model = create_model()
26
27  # Set the infeed and outfeed options.
28  model.set_infeed_queue_options(prefetch_depth=2)
29  model.set_outfeed_queue_options(buffer_depth=2)
19.8. Saving and loading Keras models
Saving and loading a Keras model must be done within the IPUStrategy scope in order to save/load IPU-specific information.
When saving and loading Model subclasses, make sure to save and restore
class members, such as layers, via the config. This can be done by overriding
the get_config and from_config methods. Re-creating members from scratch
can cause errors, as the original members may be restored as part of the
IPU-specific internal state.
Note
The arguments pipelining_kwargs from set_pipelining_options() and
gradient_accumulation_optimizer_kwargs from set_gradient_accumulation_options()
are not serializable, which means that when the model
is being saved, their values are not saved. When restoring/loading a model,
call set_pipelining_options() or set_gradient_accumulation_options()
again.
19.9. Exporting precompiled Keras models for TensorFlow Serving
There are two ways of exporting Keras models for TensorFlow Serving, independent of whether they’re pipelined or not.
Keras models can be exported using the tensorflow.python.ipu.serving.export_keras() function.
This takes only three arguments: the model to export, a directory where the SavedModel will be stored and, optionally, a batch size value.
The other way uses the model’s export_for_ipu_serving() method which takes only the path to the SavedModel directory and, optionally, a batch size value.
It’s important to note that before exporting the model you must build it, providing the input shapes to the model’s build() method.
Similarly to exporting non-Keras models, you can set the iteration
parameter by calling the model’s compile() method with steps_per_execution argument. The meaning of that parameter is analogous to that of non-Keras models, both non-pipelined and pipelined ones.
In both cases you can use it to tweak the inference latency.
The export_for_ipu_serving() method adds the possibility of passing the preprocessing_step and postprocessing_step
functions which will be included into the SavedModel graph and executed on the CPU on the server. If all preprocessing
and postprocessing operations are available on the IPU, preprocessing_step and postprocessing_step functions should
be called inside the Keras model. Then function bodies will be compiled together with the inference model.
Exported models contain Poplar programs compiled for specific batch size value. Because of that, you must always provide the batch size value to be used by the exported model. You can achieve it in two ways:
passing the
batch_sizeargument explicitly to the export function, orsetting the batch size value during model creation and leaving the default value of the
batch_sizeargument.
19.9.1. Non-pipelined Keras model example
This example creates a simple non-pipelined Keras model that adds two inputs together. After that, the model is exported for TensorFlow Serving.
 1import os
 2import shutil
 3
 4import numpy as np
 5from tensorflow.python import ipu
 6
 7import keras
 8
 9# Directory where SavedModel will be written.
10saved_model_directory = './my_saved_model_ipu/007'
11# Directory should be empty or should not exist.
12if os.path.exists(saved_model_directory):
13  shutil.rmtree(saved_model_directory)
14
15batch_size = 1
16input_shape = (batch_size, 4)
17# Number of IPU-optimized loop's iterations.
18iterations = 16
19
20# Configure the IPU for compilation.
21cfg = ipu.config.IPUConfig()
22cfg.auto_select_ipus = 1
23cfg.device_connection.enable_remote_buffers = True
24cfg.device_connection.type = ipu.config.DeviceConnectionType.ON_DEMAND
25cfg.configure_ipu_system()
26
27# Always create Keras models inside an IPU strategy.
28strategy = ipu.ipu_strategy.IPUStrategy()
29with strategy.scope():
30  # Always set `batch_size` if model has explicit input layers.
31  input1 = keras.layers.Input(shape=input_shape[1:],
32                              batch_size=batch_size,
33                              name="input_1")
34  input2 = keras.layers.Input(shape=input_shape[1:],
35                              batch_size=batch_size,
36                              name="input_2")
37  x = keras.layers.Add()([input1, input2])
38  model = keras.Model(inputs=[input1, input2], outputs=x)
39
40  model.build([input_shape, input_shape])
41  # Call compile to set the number of iterations of the inference loop.
42  # It can be used to tweak the inference latency.
43  model.compile(steps_per_execution=iterations)
44
45# Export as a SavedModel.
46runtime_func = model.export_for_ipu_serving(saved_model_directory)
47# Alternatively: `runtime_func = serving.export_keras(model, saved_model_directory)`
48print(f"SavedModel written to {saved_model_directory}")
49
50# You can test the exported executable using returned `runtime_func`.
51# This should print the numbers from 2 to 17.
52strategy = ipu.ipu_strategy.IPUStrategy()
53with strategy.scope():
54  for i in range(iterations):
55    input1_data = np.ones(input_shape, dtype=np.float32) * i
56    input2_data = np.ones(input_shape, dtype=np.float32) * 2
57    print(runtime_func(input1_data, input2_data))
19.9.2. Non-pipelined Keras model example with additional preprocessing and postprocessing steps
This example exports a very simple Keras model with an embedded IPU program that adds two inputs together. The model also performs a preprocessing step (on the IPU) to compute the absolute value of the input tensors and a postprocessing step (on the IPU) to reduce the output.
 1import os
 2import shutil
 3
 4import numpy as np
 5import tensorflow as tf
 6from tensorflow.python import ipu
 7
 8import keras
 9
10# Directory where SavedModel will be written.
11saved_model_directory = './my_saved_model_ipu/009'
12# Directory should be empty or should not exist.
13if os.path.exists(saved_model_directory):
14  shutil.rmtree(saved_model_directory)
15
16batch_size = 1
17input_shape = (batch_size, 4)
18# Number of IPU-optimized loop's iterations.
19iterations = 16
20
21# Configure the IPU for compilation.
22cfg = ipu.config.IPUConfig()
23cfg.auto_select_ipus = 1
24cfg.device_connection.enable_remote_buffers = True
25cfg.device_connection.type = ipu.config.DeviceConnectionType.ON_DEMAND
26cfg.configure_ipu_system()
27
28
29# The preprocessing step is performed fully on the IPU.
30def preprocessing_step(lhs_input, rhs_input):
31  abs_layer = keras.layers.Lambda(tf.abs)
32  return abs_layer(lhs_input), abs_layer(rhs_input)
33
34
35# The postprocessing step is performed fully on the IPU.
36def postprocessing(model_result):
37  reduce_layer = keras.layers.Lambda(tf.reduce_sum)
38  return reduce_layer(model_result)
39
40
41# Always create Keras models inside an IPU strategy.
42strategy = ipu.ipu_strategy.IPUStrategy()
43with strategy.scope():
44  # Always set `batch_size` if model has explicit input layers.
45  input1 = keras.layers.Input(shape=input_shape[1:],
46                              batch_size=batch_size,
47                              name="input_1")
48  input2 = keras.layers.Input(shape=input_shape[1:],
49                              batch_size=batch_size,
50                              name="input_2")
51
52  x = keras.layers.Add()(preprocessing_step(input1, input2))
53  output = postprocessing(x)
54
55  model = keras.Model(inputs=[input1, input2], outputs=output)
56
57  model.build([input_shape, input_shape])
58  # Call compile to set the number of iterations of the inference loop.
59  # It can be used to tweak the inference latency.
60  model.compile(steps_per_execution=iterations)
61
62# Export as a SavedModel.
63runtime_func = model.export_for_ipu_serving(saved_model_directory)
64# Alternatively: `runtime_func = serving.export_keras(model, saved_model_directory)`
65print(f"SavedModel written to {saved_model_directory}")
66
67# You can test the exported executable using returned `runtime_func`.
68strategy = ipu.ipu_strategy.IPUStrategy()
69with strategy.scope():
70  for i in range(iterations):
71    input1_data = np.ones(input_shape, dtype=np.float32) * i
72    input2_data = np.ones(input_shape, dtype=np.float32) * 2
73    print(runtime_func(input1_data, input2_data))
This example exports a very simple Keras model with an embedded IPU program, which doubles the input tensor. The model also performs a preprocessing step (on the CPU) to convert string tensors to floats and a postprocessing step (on the CPU) to compute the absolute value of the outputs.
  1import os
  2import shutil
  3
  4import numpy as np
  5import tensorflow as tf
  6from tensorflow.python import ipu
  7
  8import keras
  9
 10# Directory where SavedModel will be written.
 11saved_model_directory = './my_saved_model_ipu/009'
 12# Directory should be empty or should not exist.
 13if os.path.exists(saved_model_directory):
 14  shutil.rmtree(saved_model_directory)
 15
 16batch_size = 1
 17input_shape = (batch_size, 6)
 18# Number of IPU-optimized iterations.
 19iterations = 16
 20
 21# Configure the IPU for compilation.
 22cfg = ipu.config.IPUConfig()
 23cfg.auto_select_ipus = 1
 24cfg.device_connection.enable_remote_buffers = True
 25cfg.device_connection.type = ipu.config.DeviceConnectionType.ON_DEMAND
 26cfg.configure_ipu_system()
 27
 28# Prepare the `preprocessing_step` function signature.
 29preprocessing_step_signature = (tf.TensorSpec(shape=input_shape,
 30                                              dtype=tf.string),
 31                                tf.TensorSpec(shape=input_shape,
 32                                              dtype=tf.string))
 33# Prepare the `postprocessing_step` function signature.
 34postprocessing_step_signature = (tf.TensorSpec(shape=input_shape,
 35                                               dtype=np.float32),)
 36
 37
 38# The preprocessing step is performed fully on the CPU.
 39@tf.function(input_signature=preprocessing_step_signature)
 40def preprocessing_step(lhs_input, rhs_input):
 41  transform_fn = lambda input: tf.constant(
 42      1.0) if input == "graphcore" else tf.random.uniform(shape=tuple(),
 43                                                          dtype=np.float32)
 44  transform_string = lambda input: tf.stack([
 45      tf.stack([transform_fn(elem) for elem in tf.unstack(rank1)])
 46      for rank1 in tf.unstack(input)
 47  ])
 48  return transform_string(lhs_input), transform_string(rhs_input)
 49
 50
 51# The postprocessing step is performed fully on the CPU.
 52@tf.function(input_signature=postprocessing_step_signature)
 53def postprocessing_step(model_result):
 54  return tf.abs(model_result)
 55
 56
 57# Always create Keras models inside an IPU strategy.
 58strategy = ipu.ipu_strategy.IPUStrategy()
 59with strategy.scope():
 60  # Always set `batch_size` if model has explicit input layers.
 61  input1 = keras.layers.Input(shape=input_shape[1:],
 62                              batch_size=batch_size,
 63                              name="input_1")
 64  input2 = keras.layers.Input(shape=input_shape[1:],
 65                              batch_size=batch_size,
 66                              name="input_2")
 67
 68  x = keras.layers.Add()([input1, input2])
 69
 70  model = keras.Model(inputs=[input1, input2], outputs=x)
 71
 72  model.build([input_shape, input_shape])
 73  # Call `compile` to set the number of iterations of the inference loop.
 74  # It can be used to tweak the inference latency.
 75  model.compile(steps_per_execution=iterations)
 76
 77# Export as a SavedModel.
 78runtime_func = model.export_for_ipu_serving(
 79    saved_model_directory,
 80    preprocessing_step=preprocessing_step,
 81    postprocessing_step=postprocessing_step)
 82# Alternatively: `runtime_func = serving.export_keras(
 83#   model,
 84#   saved_model_directory,
 85#   preprocessing_step=preprocessing_step,
 86#   postprocessing_step=postprocessing_step)`
 87print(f"SavedModel written to {saved_model_directory}")
 88
 89# You can test the exported executable using returned `runtime_func`.
 90strategy = ipu.ipu_strategy.IPUStrategy()
 91with strategy.scope():
 92  input1_data = tf.constant(
 93      ["graphcore", "red", "blue", "yellow", "graphcore", "purple"],
 94      shape=input_shape,
 95      dtype=tf.string)
 96  input2_data = tf.constant(
 97      ["apple", "banana", "graphcore", "orange", "pineapple", "graphcore"],
 98      shape=input_shape,
 99      dtype=tf.string)
100  print(runtime_func(input1_data, input2_data))
19.9.3. Pipelined Keras model example
This example creates a simple pipelined Keras model that adds two inputs together in the first pipeline stage and later multiplies the result of the addition operation with the second input in the second pipeline stage. After that, the model is exported for TensorFlow Serving.
Note that building, compiling and exporting look exactly the same for pipelined and non-pipelined models.
 1import os
 2import shutil
 3
 4import numpy as np
 5from tensorflow.python import ipu
 6
 7import keras
 8
 9# Directory where SavedModel will be written.
10saved_model_directory = './my_saved_model_ipu/010'
11# Directory should be empty or should not exist.
12if os.path.exists(saved_model_directory):
13  shutil.rmtree(saved_model_directory)
14
15batch_size = 1
16input_shape = (batch_size, 4)
17iterations = 16
18
19# Configure the IPU for compilation.
20cfg = ipu.config.IPUConfig()
21cfg.auto_select_ipus = 2
22cfg.device_connection.enable_remote_buffers = True
23cfg.device_connection.type = ipu.config.DeviceConnectionType.ON_DEMAND
24cfg.configure_ipu_system()
25
26# Always create Keras models inside an IPU strategy.
27strategy = ipu.ipu_strategy.IPUStrategy()
28with strategy.scope():
29  # Always set `batch_size` if model has explicit input layers.
30  input1 = keras.layers.Input(shape=input_shape[1:],
31                              batch_size=batch_size,
32                              name="input_1")
33  input2 = keras.layers.Input(shape=input_shape[1:],
34                              batch_size=batch_size,
35                              name="input_2")
36
37  with keras.ipu.PipelineStage(0):
38    x = keras.layers.Multiply()([input1, input2])
39
40  with keras.ipu.PipelineStage(1):
41    x = keras.layers.Add()([x, input2])
42
43  model = keras.Model(inputs=[input1, input2], outputs=x)
44  model.set_pipelining_options(device_mapping=[0, 1])
45
46  model.build([input_shape, input_shape])
47  # Call compile to set the number of times each pipeline stage is executed.
48  # It can be used to minimize the latency a bit.
49  model.compile(steps_per_execution=iterations)
50
51# Export as a SavedModel.
52runtime_func = model.export_for_ipu_serving(saved_model_directory)
53# Alternatively: `runtime_func = serving.export_keras(model, saved_model_directory)`
54print("SavedModel written to", saved_model_directory)
55
56# You can test the exported executable using returned runtime_func
57# This should print the even numbers 2 to 32.
58strategy = ipu.ipu_strategy.IPUStrategy()
59with strategy.scope():
60  for i in range(iterations):
61    input1_data = np.ones(input_shape, dtype=np.float32) * i
62    input2_data = np.ones(input_shape, dtype=np.float32) * 2
63    print(runtime_func(input1_data, input2_data))
19.9.4. Pipelined Keras model example with additional preprocessing and postprocessing steps
This example creates a simple pipelined Keras model that adds two inputs together in the first computational pipeline stage of the model and later multiplies the result of the addition operation with the second input in the next pipeline stage. The model also performs a preprocessing stage (on the IPU) to compute the absolute value of the input and a postprocessing stage (on the IPU) to reduce the output.
 1import os
 2import shutil
 3
 4import numpy as np
 5import tensorflow as tf
 6from tensorflow.python import ipu
 7
 8import keras
 9
10# Directory where SavedModel will be written.
11saved_model_directory = './my_saved_model_ipu/011'
12# Directory should be empty or should not exist.
13if os.path.exists(saved_model_directory):
14  shutil.rmtree(saved_model_directory)
15
16batch_size = 1
17input_shape = (batch_size, 4)
18iterations = 16
19
20# Configure the IPU for compilation.
21cfg = ipu.config.IPUConfig()
22cfg.auto_select_ipus = 4
23cfg.device_connection.enable_remote_buffers = True
24cfg.device_connection.type = ipu.config.DeviceConnectionType.ON_DEMAND
25cfg.configure_ipu_system()
26
27
28# The preprocessing step is performed fully on the IPU.
29def preprocessing_step(lhs_input, rhs_input):
30  abs_layer = keras.layers.Lambda(tf.abs)
31  return abs_layer(lhs_input), abs_layer(rhs_input)
32
33
34# The postprocessing step is performed fully on the IPU.
35def postprocessing(model_result):
36  reduce_layer = keras.layers.Lambda(tf.reduce_sum)
37  return reduce_layer(model_result)
38
39
40# Always create Keras models inside an IPU strategy.
41strategy = ipu.ipu_strategy.IPUStrategy()
42with strategy.scope():
43  # Always set `batch_size` if model has explicit input layers.
44  input1_ph = keras.layers.Input(shape=input_shape[1:],
45                                 batch_size=batch_size,
46                                 name="input_1")
47  input2_ph = keras.layers.Input(shape=input_shape[1:],
48                                 batch_size=batch_size,
49                                 name="input_2")
50  with keras.ipu.PipelineStage(0):
51    input1, input2 = preprocessing_step(input1_ph, input1_ph)
52
53  with keras.ipu.PipelineStage(1):
54    x = keras.layers.Multiply()([input1, input2])
55
56  with keras.ipu.PipelineStage(2):
57    x = keras.layers.Add()([x, input2])
58
59  with keras.ipu.PipelineStage(3):
60    x = postprocessing(x)
61
62  model = keras.Model(inputs=[input1_ph, input2_ph], outputs=x)
63  model.set_pipelining_options(device_mapping=[0, 1, 2, 3])
64
65  model.build([input_shape, input_shape])
66  # Call compile to set the number of times each pipeline stage is executed.
67  # It can be used to minimize the latency a bit.
68  model.compile(steps_per_execution=iterations)
69
70# Export as a SavedModel.
71runtime_func = model.export_for_ipu_serving(saved_model_directory)
72# Alternatively: `runtime_func = serving.export_keras(model, saved_model_directory)`
73print("SavedModel written to", saved_model_directory)
74
75# You can test the exported executable using returned runtime_func
76strategy = ipu.ipu_strategy.IPUStrategy()
77with strategy.scope():
78  for i in range(iterations):
79    input1_data = np.ones(input_shape, dtype=np.float32) * i
80    input2_data = np.ones(input_shape, dtype=np.float32) * 2
81    print(runtime_func(input1_data, input2_data))
This example creates a simple pipelined Keras model that adds two inputs together in the first pipeline stage and later multiplies the result of the addition operation with the second input in the second pipeline stage. The model also performs a preprocessing step (on the CPU) to convert string tensors to floats and a postprocessing step (on the CPU) to compute the absolute value of the outputs.
  1import os
  2import shutil
  3
  4import numpy as np
  5import tensorflow as tf
  6from tensorflow.python import ipu
  7
  8import keras
  9
 10# Directory where SavedModel will be written.
 11saved_model_directory = './my_saved_model_ipu/010'
 12# Directory should be empty or should not exist.
 13if os.path.exists(saved_model_directory):
 14  shutil.rmtree(saved_model_directory)
 15
 16batch_size = 1
 17input_shape = (batch_size, 6)
 18iterations = 16
 19
 20# Prepare the `preprocessing_step` function signature.
 21preprocessing_step_signature = (tf.TensorSpec(shape=input_shape,
 22                                              dtype=tf.string),
 23                                tf.TensorSpec(shape=input_shape,
 24                                              dtype=tf.string))
 25# Prepare the `postprocessing_step` function signature.
 26postprocessing_step_signature = (tf.TensorSpec(shape=input_shape,
 27                                               dtype=np.float32),)
 28
 29
 30# The preprocessing step is performed fully on the CPU.
 31@tf.function(input_signature=preprocessing_step_signature)
 32def preprocessing_step(lhs_input, rhs_input):
 33  transform_fn = lambda input: tf.constant(
 34      1.0) if input == "graphcore" else tf.random.uniform(shape=tuple(),
 35                                                          dtype=np.float32)
 36
 37  transform_string = lambda input: tf.stack([
 38      tf.stack([transform_fn(elem) for elem in tf.unstack(rank1)])
 39      for rank1 in tf.unstack(input)
 40  ])
 41  return transform_string(lhs_input), transform_string(rhs_input)
 42
 43
 44# The postprocessing step is performed fully on the CPU.
 45@tf.function(input_signature=postprocessing_step_signature)
 46def postprocessing_step(model_result):
 47  return tf.abs(model_result)
 48
 49
 50# Configure the IPU for compilation.
 51cfg = ipu.config.IPUConfig()
 52cfg.auto_select_ipus = 2
 53cfg.device_connection.enable_remote_buffers = True
 54cfg.device_connection.type = ipu.config.DeviceConnectionType.ON_DEMAND
 55cfg.configure_ipu_system()
 56
 57# Always create Keras models inside an IPU strategy.
 58strategy = ipu.ipu_strategy.IPUStrategy()
 59with strategy.scope():
 60  # Always set `batch_size` if model has explicit input layers.
 61  input1 = keras.layers.Input(shape=input_shape[1:],
 62                              batch_size=batch_size,
 63                              name="input_1")
 64  input2 = keras.layers.Input(shape=input_shape[1:],
 65                              batch_size=batch_size,
 66                              name="input_2")
 67
 68  with keras.ipu.PipelineStage(0):
 69    x = keras.layers.Multiply()([input1, input2])
 70
 71  with keras.ipu.PipelineStage(1):
 72    x = keras.layers.Add()([x, input2])
 73
 74  model = keras.Model(inputs=[input1, input2], outputs=x)
 75  model.set_pipelining_options(device_mapping=[0, 1])
 76
 77  model.build([input_shape, input_shape])
 78  # Call compile to set the number of times each pipeline stage is executed.
 79  # It can be used to minimize the latency a bit.
 80  model.compile(steps_per_execution=iterations)
 81
 82# Export as a SavedModel.
 83runtime_func = model.export_for_ipu_serving(
 84    saved_model_directory,
 85    preprocessing_step=preprocessing_step,
 86    postprocessing_step=postprocessing_step)
 87# Alternatively: `runtime_func = serving.export_keras(
 88#   model,
 89#   saved_model_directory,
 90#   preprocessing_step=preprocessing_step,
 91#   postprocessing_step=postprocessing_step)`
 92
 93print("SavedModel written to", saved_model_directory)
 94
 95# You can test the exported executable using returned runtime_func
 96# This should print the even numbers 2 to 32.
 97strategy = ipu.ipu_strategy.IPUStrategy()
 98with strategy.scope():
 99  input1_data = tf.constant(
100      ["graphcore", "red", "blue", "yellow", "graphcore", "purple"],
101      shape=input_shape,
102      dtype=tf.string)
103  input2_data = tf.constant(
104      ["apple", "banana", "graphcore", "orange", "pineapple", "graphcore"],
105      shape=input_shape,
106      dtype=tf.string)
107  print(runtime_func(input1_data, input2_data))
19.10. IPU-specific Keras layers and optimizers
The ipu_tensorflow_addons.keras.layers namespace contains IPU-specific
implementations of standard Keras layers and optimizers. More information,
including details of every layer and optimizer in this namespace and a code
example showing how to use it can be found in Section 20, IPU TensorFlow Addons.
19.11. Implementation details
When instantiating a standard TensorFlow Keras model inside the scope of
an IPUStrategy instance, it is dynamically injected with additional,
IPU-specific, functions.
This is done through the relevant IPU Keras extension classes:
|
|
|
|
|
19.12. Automatic loss scaling
When training deep learning models, the magnitude of computed gradients is typically significantly smaller than their corresponding weights and activations. Whilst rarely causing training issues for models using float32 precision weights, models using reduced precision formats like float16 are left vulnerable to numerical underflow and vanishing gradients.
Loss scaling aims to combat vanishing gradients by multiplying the loss value at the end of the forward pass by some loss scaling factor \({\alpha}\). Consequently, gradients obtained through back-propagation are also scaled by that constant. The aim is to shift the gradient distribution across the dynamic range, so that underflow and overflow are prevented (as much as possible) in float16. Note that the gradients need to be scaled down by the inverse of \({\alpha}\) before being consumed by the optimizer for the weight update.
Automatic loss scaling (ALS), as included with IPU Keras, eliminates the need for the manual selection of an appropriate
value for \({\alpha}\). The ALS approach observes the gradients with respect to both weights and activations.
These observations are used to generate histograms that inform the adjustment of the loss scaling factor, with the aim of
preventing excessive underflow or overflow in gradient distribution.
The proportion of FP16 gradients whose absolute values exceed histogram_bin_edge is recorded.
If this proportion is below ratio_threshold then \({\alpha}\) is scaled up by increase_factor.
Otherwise, it is scaled down by 1 / increase_factor. These updates to \({\alpha}\)
occur with a user-specified update_frequency. For more details and visual examples, see
our blogpost about ALS.
Warning
The automatic loss scaling feature in the IPU version of Keras is experimental and may lead to unexpected results. So far it has been validated for the SGD optimizer without momentum and with constant learning rate. You can see an example of it in our CNNs application.
Note
update_frequency uses the number of calls to apply_gradients to determine how often to update \({\alpha}\).
Features affecting the frequency of these calls, like replication, pipelining or gradient accumulation, might therefore
require corresponding modifications to update_frequency for ALS to exhibit the desired behavior.
The continual updating of \({\alpha}\) has the added benefit, as compared to a static scaling factor, of allowing the optimizer to adapt to changes in the distribution of magnitudes of gradients during training.
In IPU Keras, ALS can be added to any OptimizerV2-derived Keras optimizer through the
ALSOptimizer wrapper. The example below illustrates how the ALSOptimizer
wrapper can be used to add ALS functionality to a standard SGD optimizer and train a model.
 1# Simple training example using ALS.
 2
 3import numpy as np
 4
 5from tensorflow.python import ipu
 6
 7import keras
 8from keras.ipu.optimizers import ALSOptimizer
 9from keras.optimizer_v2.gradient_descent import SGD
10
11config = ipu.config.IPUConfig()
12config.auto_select_ipus = 1
13config.configure_ipu_system()
14
15strategy = ipu.ipu_strategy.IPUStrategy()
16with strategy.scope():
17  input_layer = keras.layers.Input(32)
18  x = keras.layers.Dense(16)(input_layer)
19  x = keras.layers.Dense(8)(x)
20
21  m = keras.Model(input_layer, x)
22
23  opt = SGD(0.01)
24  opt = ALSOptimizer(opt)
25
26  m.compile(loss='mse', optimizer=opt)
27
28  in_data = np.ones((128, 32), dtype=np.float16)
29  targets = 2.0 * np.ones((128, 8), dtype=np.float16)
30
31  m.fit(in_data, targets, epochs=10)
While the example above uses a keras.Model for simplicity, the ALSOptimizer wrapper can also be used within
custom TensorFlow training loops, as shown in the example below.
 1# Simple training example using ALS without keras.Model.
 2
 3import numpy as np
 4
 5import tensorflow as tf
 6from tensorflow.python import ipu
 7from tensorflow.python.ipu import loops
 8
 9import keras
10from keras.ipu.optimizers import ALSOptimizer
11from keras.optimizer_v2.gradient_descent import SGD
12
13config = ipu.config.IPUConfig()
14config.auto_select_ipus = 1
15config.configure_ipu_system()
16
17strategy = ipu.ipu_strategy.IPUStrategy()
18with strategy.scope():
19  opt = SGD(0.01)
20  opt = ALSOptimizer(opt)
21
22  layer_0 = keras.layers.Dense(16)
23  layer_1 = keras.layers.Dense(8)
24  mse = keras.losses.MeanSquaredError(
25      reduction=keras.losses.losses_utils.ReductionV2.SUM)
26
27  @tf.function(jit_compile=True)
28  def f(x, t, _):
29    y = layer_1(layer_0(x))
30    l = mse(y_true=t, y_pred=y)
31
32    v = layer_0.trainable_variables + layer_1.trainable_variables
33    g = opt.get_gradients(l, v)
34    opt.apply_gradients(zip(g, v))
35
36    return x, t, l
37
38  @tf.function(jit_compile=True)
39  def training_loop(x, t):
40    _, _, l = loops.repeat(10, f, inputs=[x, t, 0.0])
41    return l
42
43  in_data = np.ones((128, 32), dtype=np.float16)
44  targets = 2.0 * np.ones((128, 8), dtype=np.float16)
45
46  strategy.run(training_loop, args=[in_data, targets])
The following example shows how ALS can be combined with gradient accumulation (outlined in Section 19.3, Gradient accumulation) in order to simulate larger batch sizes.
 1# Simple training example using ALS with gradient accumulation.
 2
 3import numpy as np
 4
 5from tensorflow.python import ipu
 6
 7import keras
 8from keras.ipu.optimizers import ALSOptimizer
 9from keras.optimizer_v2.gradient_descent import SGD
10
11config = ipu.config.IPUConfig()
12config.auto_select_ipus = 1
13config.configure_ipu_system()
14
15strategy = ipu.ipu_strategy.IPUStrategy()
16with strategy.scope():
17  input_layer = keras.layers.Input(32)
18  x = keras.layers.Dense(16)(input_layer)
19  x = keras.layers.Dense(8)(x)
20
21  m = keras.Model(input_layer, x)
22
23  opt = SGD(0.01)
24  opt = ALSOptimizer(opt)
25
26  m.compile(loss='mse', optimizer=opt, steps_per_execution=8)
27  m.set_gradient_accumulation_options(
28      gradient_accumulation_steps_per_replica=4)
29
30  in_data = np.ones((128, 32), dtype=np.float16)
31  targets = 2.0 * np.ones((128, 8), dtype=np.float16)
32
33  m.fit(in_data, targets, epochs=10, steps_per_epoch=8)
The combination of ALS and gradient accumulation does not require the use of keras.Model, however. The example
below illustrates how ALSGradientAccumulationOptimizer can be used to provide
any OptimizerV2-derived Keras optimizer with both ALS and gradient accumulation.
Note
In order to use ALSGradientAccumulationOptimizer, the target optimizer must first be wrapped with
ALSOptimizer.
 1# Simple training example using ALS and gradient accumulation
 2# without keras.Model.
 3
 4import numpy as np
 5
 6import tensorflow as tf
 7from tensorflow.python import ipu
 8from tensorflow.python.ipu import loops
 9
10import keras
11from keras.ipu.optimizers import ALSOptimizer
12from keras.ipu.optimizers import ALSGradientAccumulationOptimizer
13from keras.optimizer_v2.gradient_descent import SGD
14
15config = ipu.config.IPUConfig()
16config.auto_select_ipus = 1
17config.configure_ipu_system()
18
19strategy = ipu.ipu_strategy.IPUStrategy()
20with strategy.scope():
21  opt = SGD(0.01)
22  opt = ALSOptimizer(opt)
23  opt = ALSGradientAccumulationOptimizer(opt, num_mini_batches=2)
24
25  layer_0 = keras.layers.Dense(16)
26  layer_1 = keras.layers.Dense(8)
27  mse = keras.losses.MeanSquaredError(
28      reduction=keras.losses.losses_utils.ReductionV2.SUM)
29
30  @tf.function(jit_compile=True)
31  def f(x, t, _):
32    y = layer_1(layer_0(x))
33    l = mse(y_true=t, y_pred=y)
34
35    v = layer_0.trainable_variables + layer_1.trainable_variables
36    g = opt.get_gradients(l, v)
37    opt.apply_gradients(zip(g, v))
38
39    return x, t, l
40
41  @tf.function(jit_compile=True)
42  def training_loop(x, t):
43    _, _, l = loops.repeat(10, f, inputs=[x, t, 0.0])
44    return l
45
46  in_data = np.ones((128, 32), dtype=np.float16)
47  targets = 2.0 * np.ones((128, 8), dtype=np.float16)
48
49  strategy.run(training_loop, args=[in_data, targets])
While it is ultimately the gradients with respect to weights and biases which are used to update the parameters of a model, gradients with respect to layer activations are also computed during each backward pass. It is possible that these gradients might saturate, thus losing information, without this being detected in upstream parameter gradients.
By wrapping a Keras
layer in the CaptureActivationGradients wrapper, these intermediate activation gradients can be recorded and added to the
statistics used to determine whether to increase or decrease \({\alpha}\). The example below shows how the activation
gradients of select layers can be incorporated into an ALSOptimizer. In order to reduce the computational cost of ALS,
the update_frequency is increased to 5 (from its default value of 1), and the accumulate_statistics_over_update_period
flag is set to False. With this setting, the ratio of gradients exceeding histogram_bin_edge are recorded only every
fifth batch, rather than being based on the average ratio over the last 5 batches.
 1# MNIST training with ALS.
 2# Uses gradients w.r.t activations and only collects statistics
 3# every 5 iterations.
 4
 5import tensorflow as tf
 6from tensorflow.python import ipu
 7
 8import keras
 9from keras.datasets import mnist
10from keras.ipu.optimizers import ALSOptimizer
11from keras.ipu.layers import CaptureActivationGradients
12from keras.optimizer_v2 import gradient_descent
13
14# Configure the IPU device.
15config = ipu.config.IPUConfig()
16config.auto_select_ipus = 2
17config.configure_ipu_system()
18
19
20# Create a simple model.
21def create_model():
22  input_layer = keras.layers.Input((28, 28, 1))
23
24  with keras.ipu.PipelineStage(0):
25    x = CaptureActivationGradients(
26        keras.layers.Conv2D(32,
27                            dtype=tf.float16,
28                            kernel_size=(3, 3),
29                            activation="relu"))(input_layer)
30    x = keras.layers.MaxPooling2D(pool_size=(2, 2))(x)
31    x = CaptureActivationGradients(
32        keras.layers.Conv2D(64,
33                            dtype=tf.float16,
34                            kernel_size=(3, 3),
35                            activation="relu"))(x)
36
37  with keras.ipu.PipelineStage(1):
38    x = keras.layers.MaxPooling2D(pool_size=(2, 2))(x)
39    x = keras.layers.Flatten()(x)
40    x = keras.layers.Dropout(0.5)(x)
41    x = CaptureActivationGradients(keras.layers.Dense(10,
42                                                      activation="softmax"))(x)
43
44  m = keras.Model(inputs=input_layer, outputs=x)
45  m.set_pipelining_options(gradient_accumulation_steps_per_replica=8)
46
47  return m
48
49
50# Create a dataset for the model.
51def create_dataset():
52  (x_train, y_train), (_, _) = mnist.load_data()
53  x_train = x_train / 255.0
54  x_train = tf.expand_dims(x_train, -1)
55
56  train_ds = tf.data.Dataset.from_tensor_slices(
57      (x_train, y_train)).shuffle(10000).batch(32, drop_remainder=True)
58  train_ds = train_ds.map(lambda d, l:
59                          (tf.cast(d, tf.float32), tf.cast(l, tf.int32)))
60
61  return train_ds.repeat().prefetch(16)
62
63
64# Create the optimizer.
65def create_optimizer():
66  o = gradient_descent.SGD(0.01)
67  return ALSOptimizer(o,
68                      update_frequency=5,
69                      accumulate_statistics_over_update_period=False)
70
71
72dataset = create_dataset()
73
74# Create a strategy for execution on the IPU.
75strategy = ipu.ipu_strategy.IPUStrategy()
76with strategy.scope():
77  # Create a Keras model inside the strategy.
78  model = create_model()
79
80  # Create the optimizer and ALS wrapper.
81  opt = create_optimizer()
82
83  # Compile the model for training.
84  model.compile(loss=keras.losses.SparseCategoricalCrossentropy(),
85                optimizer=opt,
86                metrics=["accuracy"],
87                steps_per_execution=8)
88
89  model.fit(dataset, epochs=50, steps_per_epoch=8)