System platform software configuration
The IPU-POD DA product implements a close-to-zero configuration experience when it comes to server setup and IPU-M2000 software configuration and installation. Network setup between servers and IPU-M2000s is also automated, both for the management network and the data-plane RoCE network (server RNIC to IPU-M2000 directly cabled network). No other changes are required to any existing server networking.
The system platform includes both the server and the IPU-M2000s and their software and networking configuration.
Three software installation and configuration steps are required for bringing the system up to be a fully functional machine learning (ML) system.
Steps 1+2: IPU-POD DA system platform software installation and configuration
Step 1: Install the release bundle to the
ipuuseradmin accountStep 2: Install server packages, upgrade IPU-M2000 software and configure networking
Step 3: Poplar SDK and tools installation
This chapter covers the first two steps. Step 3, the installation of Poplar SDK and its accompanying tools, is covered in separate Poplar documentation which can be found here.
The system platform installation handles all aspects of the system platform software installation, as well as upgrade and configuration, to bring the system up to a functional ML platform on which the Poplar SDK can be installed. It also leaves system wide configuration files available for all Poplar user accounts, allowing the IPU-POD to be shared between users (as far as ML model size allows sharing of the available IPUs).
The system platform installation step will install all the required software dependencies for software upgrade and network setup between all parts of the system platform. Once the IPU-POD is powered on, this step will automatically detect the number of IPU-M2000s in the IPU-POD and configure the server accordingly.
Before performing the system platform installation step, you must:
Create an account dedicated to administration of the IPU-M2000s (see Create an account for IPU-M2000 administration)
Download the correct IPU-M2000 system software release from the Graphcore support portal (see Download the IPU-M2000 system software release)
Then the software installation and configuration of both the server and direct attached IPU-M2000s can be carried out (see System platform installation and configuration). This involves running two scripts: the bundle install script and the IPU-POD DA install script. It is important to run through the checklist in Checklist before running the IPU-POD DA install script before running the IPU-POD DA install script.
Create an account for IPU-M2000 administration
Firstly an IPU-M2000 admin account named ipuuser needs to be created. This account is used as a trusted admin account for IPU-M2000 installation and management tasks.
This user account needs sudo rights for running the IPU-POD DA install script. The other administration tools only need network access therefore sudo rights are not required for running these tools.
Download the IPU-M2000 system software release
You need to download the correct IPU-M2000 system software release before any software upgrade of the IPU-M2000s and the server OS configuration can be performed. To perform the download, follow these steps:
Login with the IPU-M2000 admin account
ipuuserGo to the Graphcore download portal https://downloads.graphcore.ai and download the required release (normally the latest) and land it in the server’s
/tmpdirectoryFollow the install instructions in the release notes, and perform:
cd /tmp
sudo tar xvfz <downloaded-tar-ball.tar.gz>
System platform installation and configuration
The software installation and configuration of both the server and direct attached IPU-M2000s is carried out by running two scripts – the bundle install script (Installing the IPU-M2000 software release) and the IPU-POD DA install script (System configuration including network setup).
Installing the IPU-M2000 software release
The first script to run is the bundle install script that installs the server tools for IPU-M2000 management, as well as the binaries used for a later software upgrade of IPU-M2000s.
This initial install doesn’t start an upgrade of the IPU-M2000s, but instead prepares the current user to be able to run the necessary commands for later management tasks.
cd /tmp/IPU-M_SW-<release>
./install.sh
exit    # and re-login to have an updated user environment
The following tasks are performed:
Loads the release file tree onto a well-defined location in the home directory of the current user performing the installation. The directory is
~/IPU-M_releases.Installs an admin tool called
rack_tooland sets up a config file that controls its behaviour. Also create a symbolic link torack_toolfrom~/.local/bin/rack_tooltorack_tool.pyin the release file tree.
See rack_tool for more details on rack_tool and how this is used for IPU-M2000 administration.
Checklist before running the IPU-POD DA install script
Before running the IPU-POD DA install script, the administrator must decide the names of the network devices that will be used for the network connected to the IPU-POD.
The management network device must be identified. The name of this interface will be listed by the IPU-POD DA install script if it is unmanaged (currently unused).
The data-plane network devices (RNIC-to-RNIC links) must be identified. The names of these interfaces will be listed by the IPU-POD DA install script if they are unmanaged (currently unused). The IPU‑POD4 DA system needs one such device and the IPU‑POD16 DA system needs four.
Please run the following command to list unmanaged devices:
networkctl
Example output from running this command is shown below. To be available for the IPU-POD DA install script, the interfaces to be used must be marked as “unmanaged” as in the example below. Any automated netplan/system/puppet setup of these interfaces must be removed.
For example, if they have previously been configured using netplan, removing these interfaces from /etc/netplan files and running netplan try will make them “unmanaged”.
In the example below, eno1 and the 4 RNIC interfaces enp* will be found in a state that makes the IPU-POD DA install script able to see them as unmanaged (unused).
Note
Be careful not to remove the interface that is listed as “configured” in netplan files since this is the interface that allows you to login to the server (eno2 in the example shown below).
$ networkctl
IDX LINK             TYPE               OPERATIONAL SETUP
1 lo               loopback           carrier     unmanaged
2 eno1             ether              routable    unmanaged
3 eno2             ether              routable    configured
4 enp129s0f0       ether              routable    unmanaged
5 enp129s0f1       ether              routable    unmanaged
6 enp161s0f0       ether              routable    unmanaged
7 enp161s0f1       ether              routable    unmanaged
System configuration including network setup
The next step is to run the IPU-POD DA install script as root by using sudo.
There is no need to do an uninstall before upgrading to a new release.
Note
If user input to the script during installation was incorrect then an uninstall will be required, followed by a new install
cd  ~/IPU-M_releases/IPU_M_SW-<release>
sudo ./direct-attach install
During installation and configuration, the IPU-POD DA install script will communicate with the IPU-M2000 system software that needs to be running on the IPU-M2000. For this reason, the installation script is bundled with a matching IPU-M2000 system software release package that will be installed on the IPU-M2000s if not already installed.
The IPU-POD DA install script performs the following tasks:
Identifies and requests installation of the required server OS packages. You can abort and install these manually if required.
Installs and activates a Linux systemd service
gc-ipu-networkfor correct network setup for communication with IPU-M2000s, both for Poplar SDK users (RDMA data-plane) as well as for IPU-M2000 hardware and software management (management-plane).Proposes the use of a default IP subnet 10.44.44.0/24 – you can change the subnet to be used during installation if required. This subnet will be further divided into smaller subnets for the point-to-point RDMA links, GW and BMC network management. These IP addresses are local addresses that are not shared outside the single server system. This means the same subnet can be reused by other servers for their directly attached IPU-M2000s.
Checks if IPU-M2000 software upgrade is required and if yes, installs and activates the IPU-M2000 system software release on all IPU-M2000s so that they are all running the same software. This ensures that the IPU-POD DA install script has matching software running on the IPU-M2000s for the remainder of the configuration steps.
Performs the V-IPU configuration of the IPU-M2000s by selecting a master IPU-M2000 to run the V-IPU controller.
Activates the V-IPU controller for auto-discovery of other IPU-M2000s, referred to as discovery of V-IPU agents in the text output from the IPU-POD DA install script.
Creates a V-IPU cluster from the discovered V-IPU agents.
Tests the V-IPU cluster by checking if cabling and link quality is as expected and shows the cluster test results.
Creates a V-IPU partition with all IPUs in the discovered IPU-M2000s. The partition information is stored in a file in the server system-wide directory /etc/ipuof.conf.d. The single file in this directory is picked up by Poplar and is used for connecting to the IPU-M2000s. This file is shared by all users running Poplar sharing the same IPU-POD DA system. When a Poplar instance is starting, Poplar will select a free IPU in this partition and generate an error if there are no more free IPUs to be allocated.
Stores a log of actions taken during the installation and configuration process.
Asks if the IPU-POD DA install script should setup port forwarding to allow remote web browsers to access the V-IPU controller’s web interface running on the master IPU-M2000.
Copying the IPU-M2000 software into the IPU-M2000 admin user’s home directory under IPU-M_releases will automatically create a directory tree with a leading directory name equal to the release package name and version number. This allows several releases to be kept on the server, in case you need to revert to a previous release of the IPU-M2000 software. If this is not needed, the older releases (both the unpacked files and the downloaded tar file) can be removed from the server. The current installation or the release to be installed needs to be present.
Output from bundle install script
From running the bundle install script:
./install.sh
The output should be as follows (example given for software release 2.0.0):
## Copying /tmp/IPU_M_SW-2.0.0 to /home/ipuuser/IPU-M_releases ##
## Symlinking /home/ipuuser/IPU-M_releases/IPU_M_SW-2.0.0/maintenance_tools/
rack_tool.py to /home/ipuuser/.local/bin/rack_tool ##
## No default rack_config.json specified. Set GC_RACK_TOOL_DEFAULT_CONFIG_PATH
to point to default config ##
## Installing pip dependencies ##
## Install completed ##
Note that the comment No default rack_config.json specified can be ignored since this will be resolved by the IPU-POD DA install script setting up the rack_config.json configuration file (see below).
Output from IPU-POD DA install script
From running the IPU-POD DA install script:
cd  ~/IPU-M_releases/IPU_M_SW-<release>
sudo ./direct-attach install
The output should be as follows for an IPU‑POD16 DA system (example given for software release 2.0.0):
Graphcore IPU-POD Direct Attach installer for SW version: 2.0.0
Please make sure all cables are properly attached according to documentation, and that all IPU-M2000(s)
are powered on, before continuing installation.
NOTE: Running this installer will interrupt any ongoing Poplar workloads.
Do you want to continue? (y/n): y

All required packages already installed
How many IPU-M2000 are attached? 4
A /24 subnet is required, is 10.44.44.0/24 okay?  (y/n): y
Management device configuration:

A dedicated network device on this host needs to be connected to the upper RJ-45 network port
of the top IPU-M2000, and then cabled downwards in a daisy-chain fashion (see docs for diagram).

Note that only unmanaged devices that are not configured by netplan or NetworkManager will
be available.

Available network devices:
1 - eno1 Broadcom Inc. and subsidiaries NetXtreme BCM5720 Gigabit Ethernet PCIe
2 - br-c2f59026c83d
3 - veth9f42328
Input management network device number or name: 1
eno1 selected as management network device.

Found exactly 4 RNIC devices:
- enp129s0f0 Mellanox Technologies MT28800 Family [ConnectX-5 Ex] (cable detected)
- enp161s0f0 Mellanox Technologies MT28800 Family [ConnectX-5 Ex] (cable detected)
- enp129s0f1 Mellanox Technologies MT28800 Family [ConnectX-5 Ex] (cable detected)
- enp161s0f1 Mellanox Technologies MT28800 Family [ConnectX-5 Ex] (cable detected)
Are all these network interfaces connected to IPU Machines?  (y/n): y
enp129s0f0, enp161s0f0, enp129s0f1, enp161s0f1 selected as RNIC network device(s).

Port forwarding and V-IPU web interface:
The V-IPU provides a web interface on port 8092. This web interface requires
an envoy proxy server running on port 9900. In order to provide external access
to the web interface both ports must be forwarded from the current machine

Port forwarding and BMC web interfaces:
Each one of the connected BMCs provides a web interface on port 443. These ports could be
externally accessed through ports 7800, 7801, 7802, 7803 if wanted

Do you allow the forward of ports 7800, 7801, 7802, 7803, 8092 and 9900 using the detected
external network interface eno2? (y/n): y
Installing and starting service gc-ipu-network.
This service is responsible for setting up networking and starting up the DHCP servers that
will assign IP addresses to IPU-M2000(s).
Created symlink /etc/systemd/system/multi-user.target.wants/gc-ipu-network.service → /etc/systemd/system/gc-ipu-network.service.
Scanning for 4 IPU-M2000. Note that this may take some minutes...
| |                              #                 | 0 Elapsed Time: 0:02:40
Four (4) IPU-M2000(s) found, in stacking order:
Unit 4:  serial 8204721-0071 - BMC 10.44.44.92 GW mgmt 10.44.44.93 GW rnic (via enp161s0f1) 10.44.44.226
Unit 3:  serial 8204721-0084 - BMC 10.44.44.98 GW mgmt 10.44.44.99 GW rnic (via enp161s0f0) 10.44.44.245
Unit 2:  serial 8204721-0092 - BMC 10.44.44.61 GW mgmt 10.44.44.62 GW rnic (via enp129s0f1) 10.44.44.237
Unit 1:  serial 8204721-0065 - BMC 10.44.44.74 GW mgmt 10.44.44.75 GW rnic (via enp129s0f0) 10.44.44.253
All IPU-M2000(s) have release IPU-M SW 2.0.0 installed, no upgrade needed.
Stopping all existing V-IPU servers...
\ |   #                                           | 0 Elapsed Time: 0:00:25
Restarting all V-IPU agents...
\ |                                    #          | 0 Elapsed Time: 0:00:29
Removing any existing V-IPU partitions, clusters and agents...
Creating new V-IPU agents and cluster...
Testing cluster, this will take some time...
- |         #                                     | 0 Elapsed Time: 0:02:11

Showing test results for cluster da-cluster
Type   | Duration | Passed | Summary
-------------------------------------------------------------------------
Sync-Link   | 0.42s    | 6/6    | Sync Link test passed
Cabling     | 0.79s    | 12/12  | All cables connected as expected
IPU-Link    | 139.99s  | 76/76  | All Links Passed
Traffic     | 203.18s  | 1/1    | Traffic test passed
Version     | 0.01s    | 6/6    | All component versions are consistent
-------------------------------------------------------------------------
Adding V-IPU partition with 16 IPUs...
| |                                               | 0 Elapsed Time: 0:02:26

Please find installation logs at: /home/ipuuser/IPU-M_releases/IPU_M_SW-2.0.
0 /maintenance_tools/ logs/direct-attach-20210304T2105.log

V-IPU web server running at: http://10.129.96.107:8092
BMC-1 web server running at: https://10.129.96.107:7800
BMC-2 web server running at: https://10.129.96.107:7801
BMC-3 web server running at: https://10.129.96.107:7802
BMC-4 web server running at: https://10.129.96.107:7803

Installation completed!!
If you run the IPU-POD DA install script again on an already configured system, it will start by asking you to accept the previous input given:
Graphcore IPU-POD Direct Attach installer for SW version: 2.0.0

Found existing Direct Attach configuration with the following parameters:
    count :  4
    subnet:  10.44.44.0/24
    mgmt  :  eno1
    rnic  :  ['enp129s0f0', 'enp161s0f0', 'enp129s0f1', 'enp161s0f1']
    allow_port_forwarding  :  True
    ext_net_if  :  eno2
    master_gw_ip  :  10.44.44.75

Do you want to continue with these parameters? If you have experienced
troubles with the install, choose No (y/n): y
The installation will continue in the same way as the first time installation, but without the questions.
IPU-M2000 maintenance, management and control
IPU-POD DA system software upgrades
The IPU-POD DA install script will, the first time it is run, install and upgrade the software required on the server as well as on the IPU-M2000s if needed.
When running the IPU-POD DA install script in later releases, the install script will:
make any necessary changes to the server setup, install and upgrade server packages
Upgrade all IPU-M2000s with the new IPU-M2000 software release
Note
Be aware that running a software install and upgrade will require a maintenance window of up to 1.5 hours (IPU‑POD16 DA system) where no Poplar workloads are allowed to run. All ongoing Poplar workloads will fail due to the IPU-M2000s going through a reset cycle as well as a system test cycle. Note that future releases of the IPU-M2000 upgrade tools will significantly reduce this time.
Hardware management of IPU-M2000 via BMC management interface
BMC management and operation are available via:
SSH login to the BMC command line on each IPU-M2000
OpenBMC tool
openbmctool.py. This tool is found here:~/IPU-M_releases/IPU_M_SW_<release_version>/bmc/bmc_software/openbmctool.pyBMC web GUI
The URLs and IP addresses of each BMC are provided by the IPU-POD DA install script and are also found in the installation log.
If you have a browser running locally on the direct attach server, the BMC web GUI can be reached by opening the URL https://<BMC_IP_address>
where BMC_IP_address can be found by running the following command - note this is only available if you enabled port forwarding during installation:
grep "Unit " ~/IPU-M_releases/IPU_M_SW_<release_version>/maintenance_tools/
logs/direct-attach-<date&time>.log | cut -d " " -f 7-8,13-14
This example is for an IPU‑POD16 DA system so there are four BMC IP addresses, one per IPU-M2000. Unit 1 (IPU-M2000 #1) is shown at the bottom which reflects the physical placement of the IPU-M2000s in the rack:
Unit 4: BMC 10.44.44.92
Unit 3: BMC 10.44.44.98
Unit 2: BMC 10.44.44.61
Unit 1: BMC 10.44.44.74
The URLs are also listed in the installation logs so if you disabled port forwarding during installation the you can use the following method instead.
They are listed as lines beginning with “BMC-<n> web server running at” in the latest installation logs which can be found here: ~/IPU-M_releases/IPU_M_SW_<release_version>/maintenance_tools/logs/direct-attach-<date&time>.log. In this case however Unit 1 (IPU-M2000 #1) is at the top of the list, which is the reverse order of the physical IPU-M2000 placement in the rack:
BMC-1 web server running at: https://10.44.44.74
BMC-2 web server running at: https://10.44.44.61
BMC-3 web server running at: https://10.44.44.98
BMC-4 web server running at: https://10.44.44.92
The standard BMC web server port 443 is mapped to unique port numbers as follows:
Unit 4: BMC web server: https://<direct-attach-server>:7803
Unit 3: BMC web server: https://<direct-attach-server>:7802
Unit 2: BMC web server: https://<direct-attach-server>:7801
Unit 1: BMC web server: https://<direct-attach-server>:7800
Refer to the BMC user guide for more details about openbmctool and the BMC web GUI.
V-IPU management via V-IPU controller GUI
There is an intuitive V-IPU controller graphical user interface (GUI) which can be accessed via the RNIC port or the GW management port. This interface is useful for both Poplar users and IPU-M2000 admin users - see IPU-M2000 V-IPU controller GUI.
V-IPU management via GW command line
The IPU-M2000 offers an SSH-based itadmin account on the GW allowing access the vipu-admin command line interface (CLI). This CLI is not intended for daily operation of the IPU-M2000s but can be used for troubleshooting if the graphical user interface is not sufficient.
The V-IPU Admin Guide contains the required information and should be consulted for details – it is available here. Make sure the selected document version matches the two first major.minor version numbers of the V-IPU software running on the master IPU-M2000. To find the version number, run the command vipu-admin --version.
IPU-M2000 V-IPU controller GUI
The master IPU-M2000 in the IPU-POD contains a V-IPU web server that will export a V-IPU controller GUI that allows a view into the automatically configured and populated V-IPU cluster, representing the IPU-M2000s.
The user interface shows managed entities such as V-IPU agents (one for each IPU-M2000) stacked in a V-IPU cluster (representing the physical order and IPU-Link cabling information). It also shows the default V-IPU partition that is the shared IPU resource pool presented to all Poplar users on the system.
The Poplar user(s) can also use this interface to perform a “partition reset” that allows the links, sync network and IPUs to be set up again. Care should be taken when resetting the partition if multiple users are sharing the system.
If you have a browser running on the direct attach server, the user interface can be reached by opening this URL:
http://<ip_address_of_v-ipu_web_server>:8092
You can find the IP address of the V-IPU web server in the IPU-POD DA install script output or in the installation logs. In this example the V-IPU web server IP address can be found by running this command:
grep master_gw_ip /var/lib/gc-ipu-network/config.json
If you want to access the V-IPU web GUI from a remote computer instead, then you need to connect to it using the port forwarding option that was setup in the direct attach server (this option is obviously only available if port forwarding was enabled during the installation). In this case the direct attach server now works as a proxy for the V-IPU web server, and the URL uses the direct attach server’s IP address like this:
URL http://<direct_attach_server>:8092.
This remote URL address can be found in the latest installation log as the line starting with V-IPU web server running a. The latest installation log can be found here: ~/IPU-M_releases/IPU_M_SW_<release_version>/maintenance_tools/logs/direct-attach-<date&time>.log.
System Overview page
The System Overview page is the front page presented when connecting to the user interface. It shows the system information represented by the top-level managed entities that are automatically configured in the master V-IPU controller during setup.
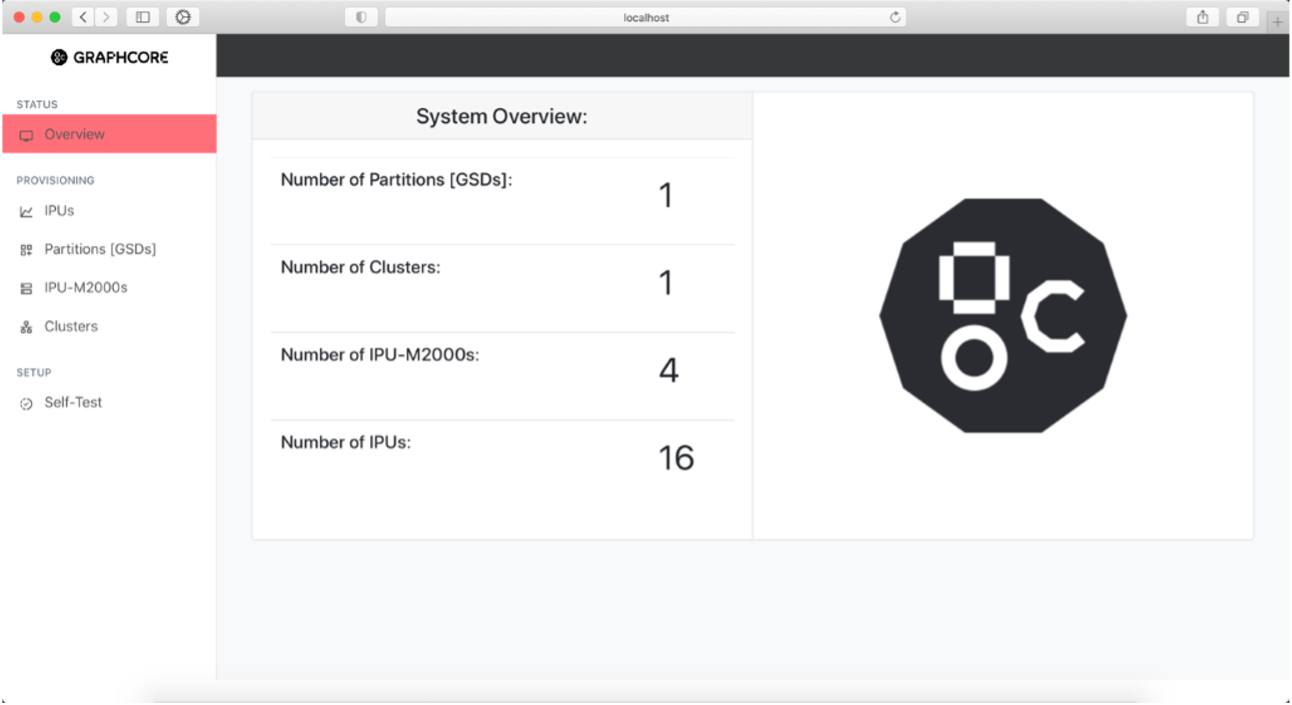
Fig. 26 System Overview page
You can select any of the different stats in the System Overview to be taken directly to their corresponding page for further information or use the left sidebar view to navigate.
Discovered IPUs information page
This page shows basic information about all IPUs found in the system and how they are uniquely identified within each IPU-M2000. The architecture column shows the IPU chip generation.
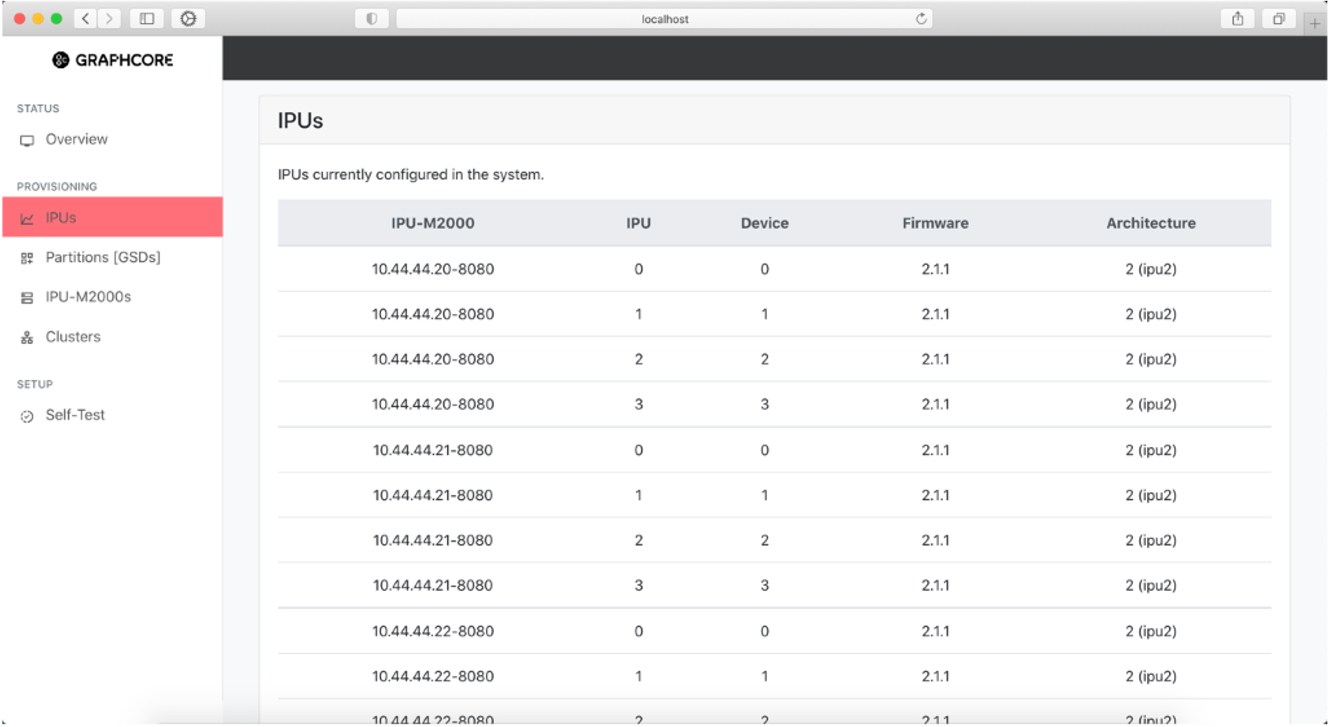
Fig. 27 IPUs found in the system
Created Partitions [GSDs] information page
The Partitions [GSDs] page shows information about all partitions or GSDs (Graphcore Scaleout Domains) configured on the system. The system currently only supports a single partition to be created automatically.
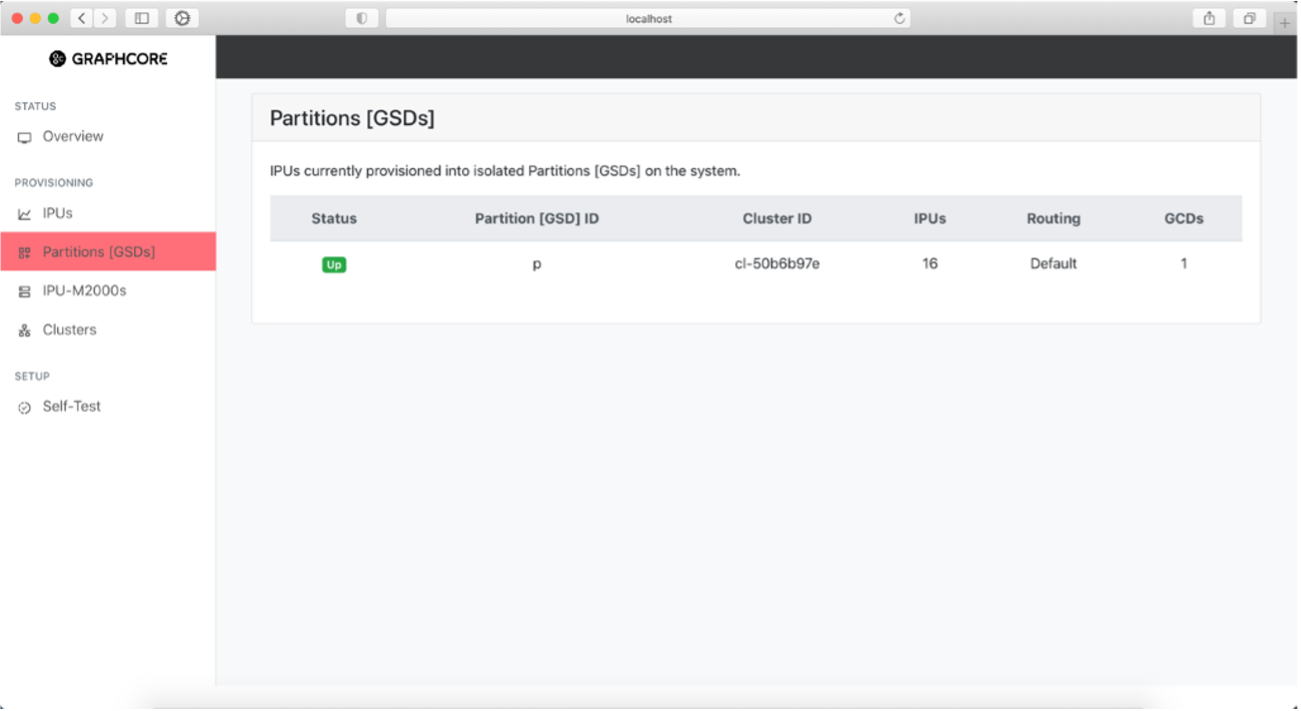
Fig. 28 Partitions in the system
To get further information about a partition you can select a partition and get a more descriptive view.
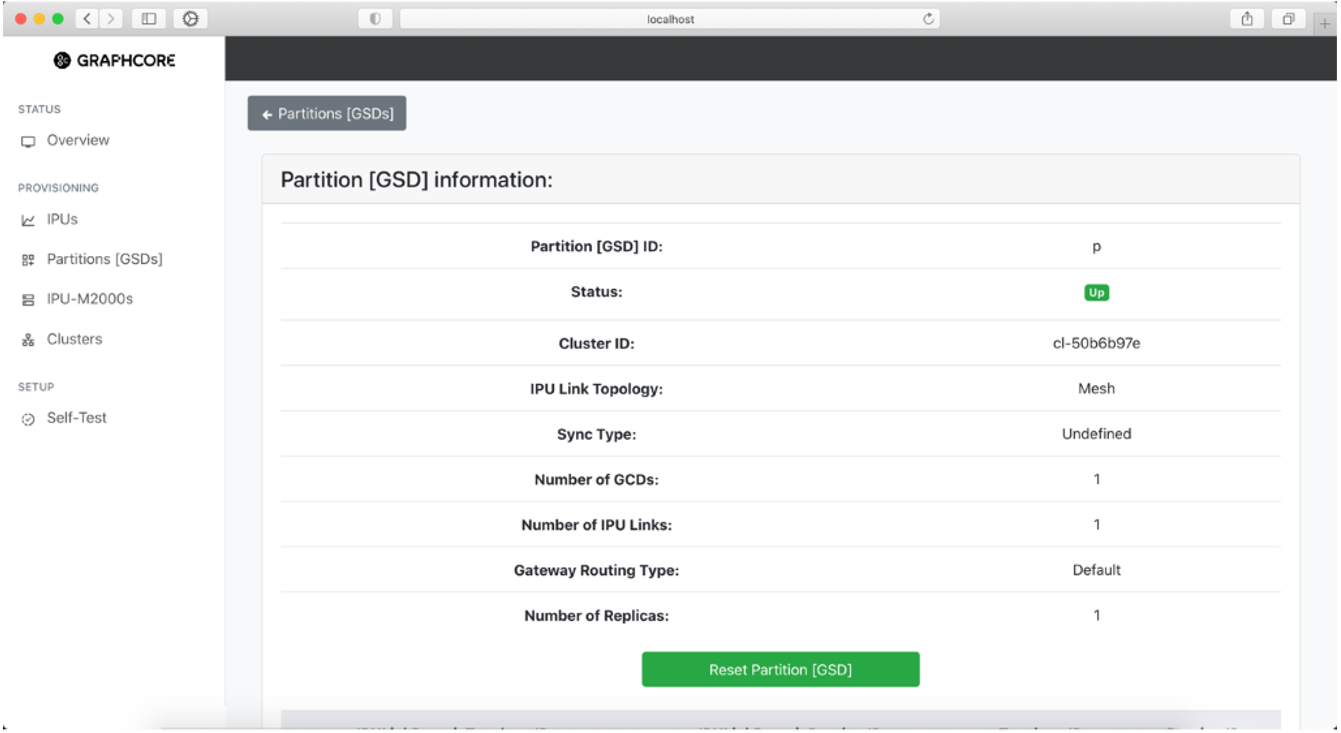
Fig. 29 Information on partition in the system
To reset a partition, click the “Reset Partition [GSD]” button. This will display a warning, and if you click “Continue” it will initiate the reset.
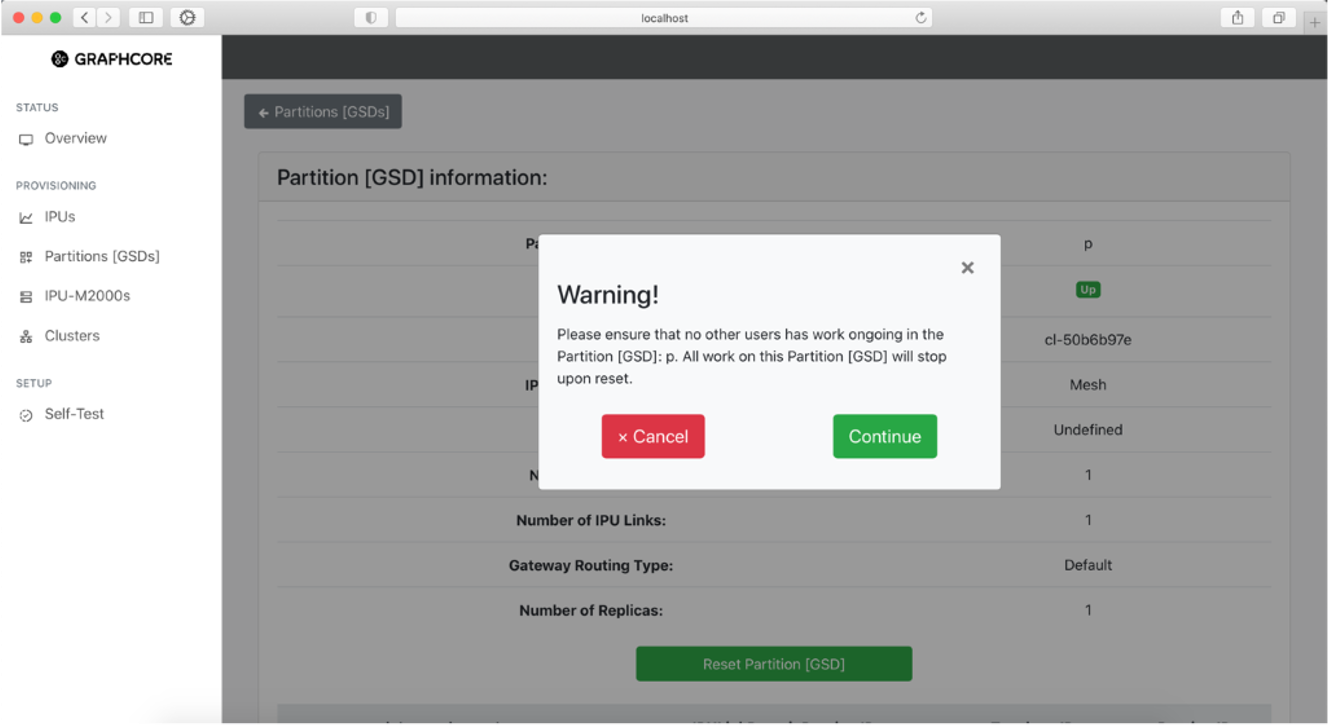
Fig. 30 Resetting a partition in the system
IPU-M2000s information page
The IPU-M2000 information page shows information about all discovered IPU-M2000s in the system. It lists the IP addresses used to access the GW management port via SSH.
This page also shows the test result indicator of the last cluster test performed.

Fig. 31 IPU-M2000s in the system
To see further information about an IPU-M2000, go to the “IPU-M2000s” table and click on the desired IPU-M2000. This will open a page showing more detailed information for the selected IPU-M2000.
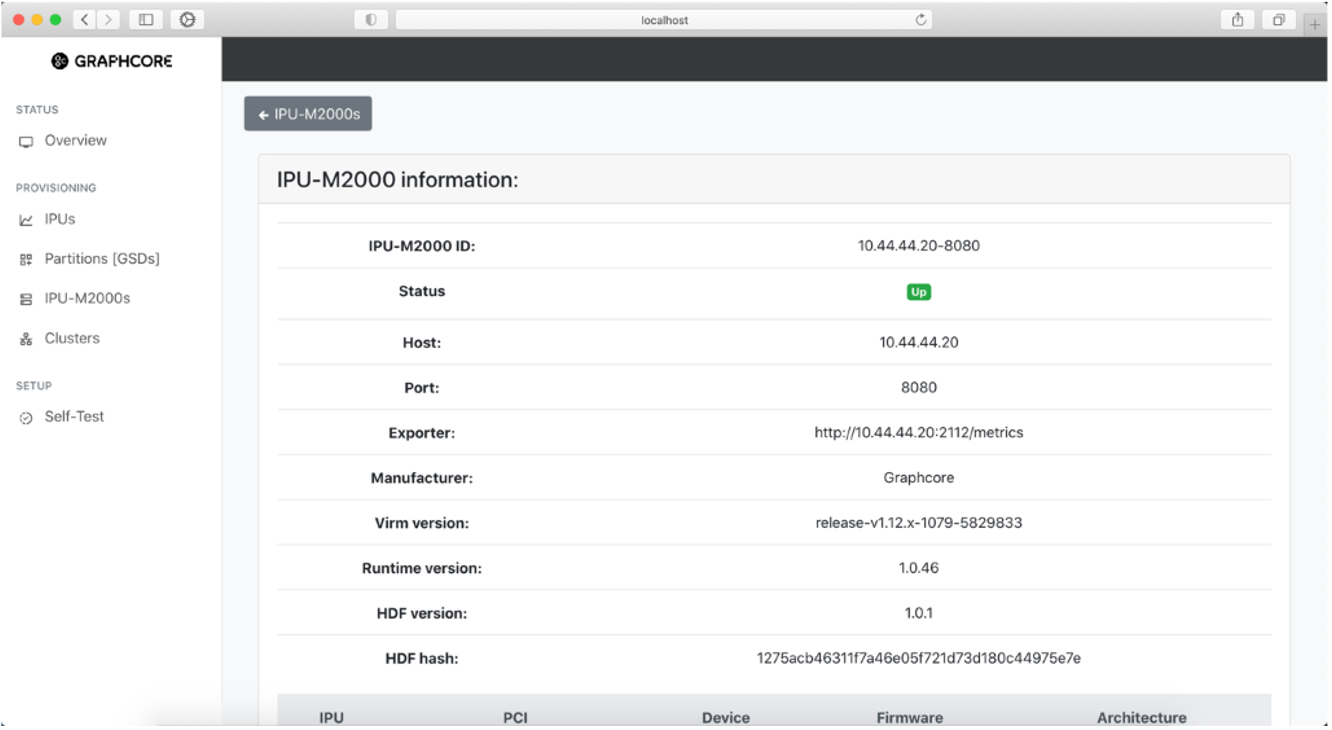
Fig. 32 Information on selected IPU-M2000 in the system
Cluster information pages
The Clusters page shows a list of all the discovered clusters currently configured on the system as well as some basic information regarding each cluster.
The direct attach system only supports a single cluster. The cluster represents all the IPU-M2000s in the IPU-POD. Cluster attributes give information about the cabling topologies detected when scanning cable routing between IPU-M2000s. The number of IPUs found in the system is 4 for an IPU‑POD4 DA system, and 16 for an IPU‑POD16 DA system.
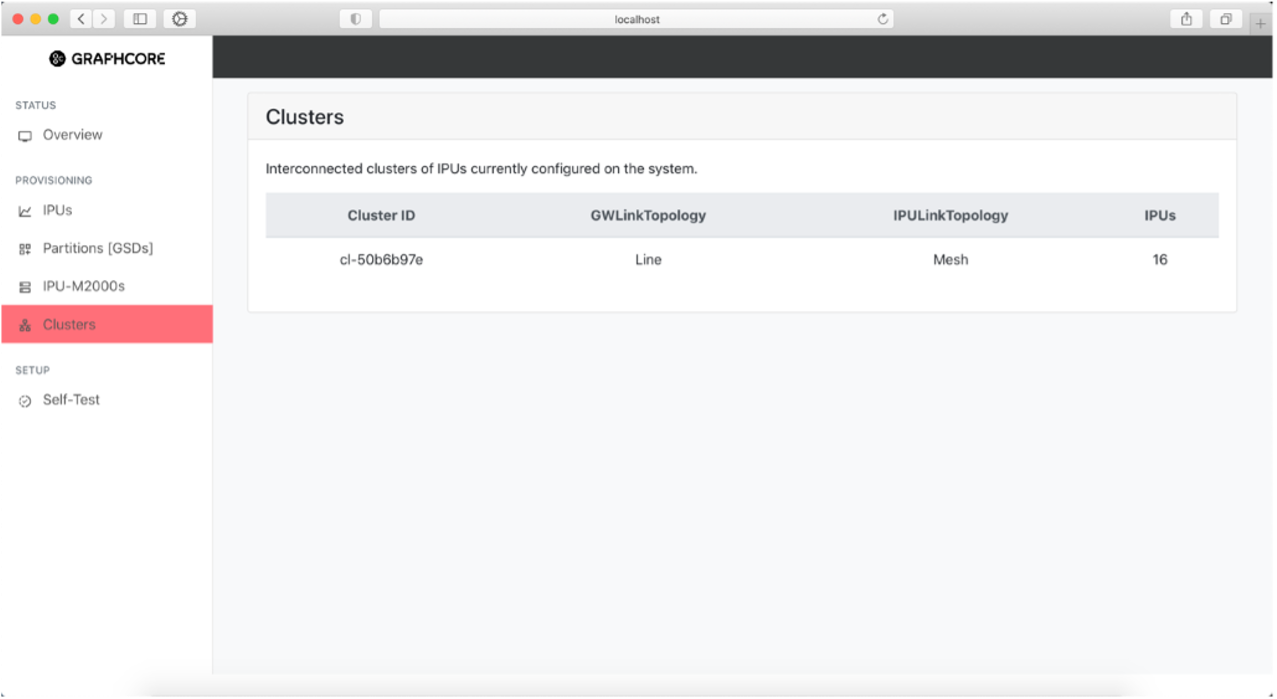
Fig. 33 Clusters in the system
You can click on a cluster to open the Cluster Information page with more information:
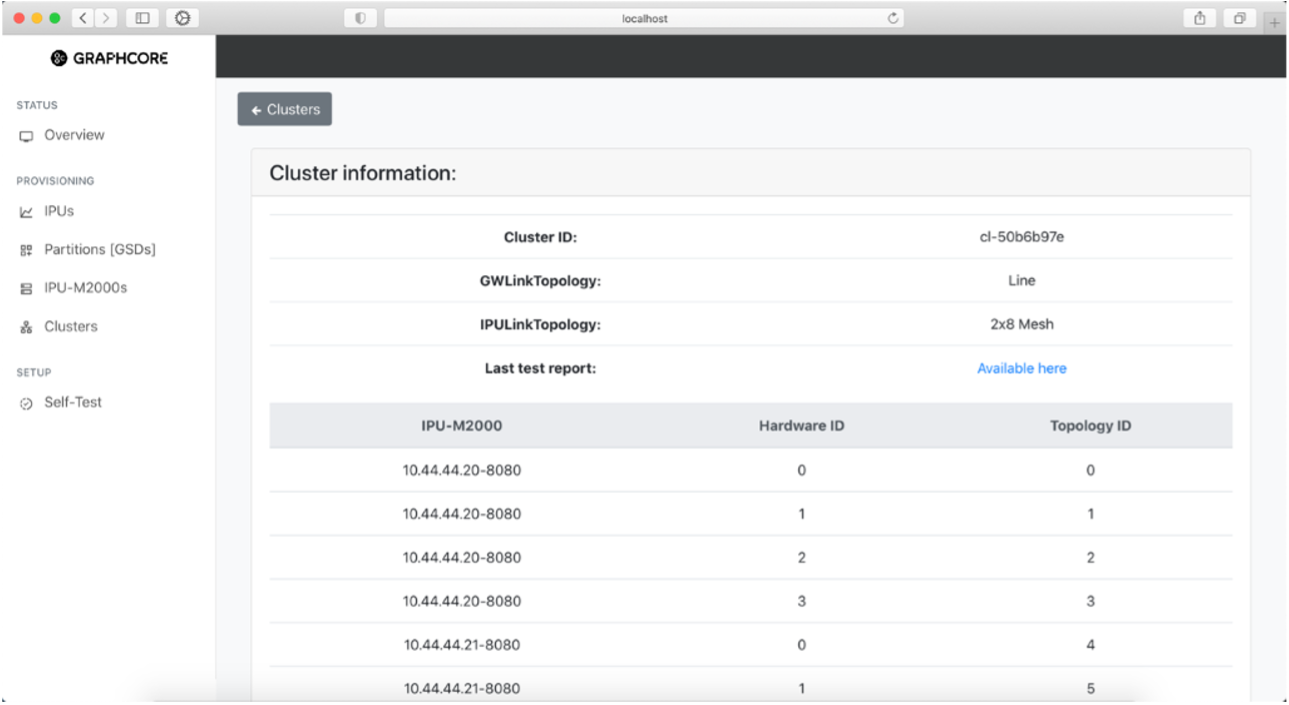
Fig. 34 Information on selected cluster in the system
Self-Test page
The Self-Test page shows the latest run self-test. In this version of the software, the self-test result is the one that was generated when the cluster test was run during the IPU-POD DA installer.
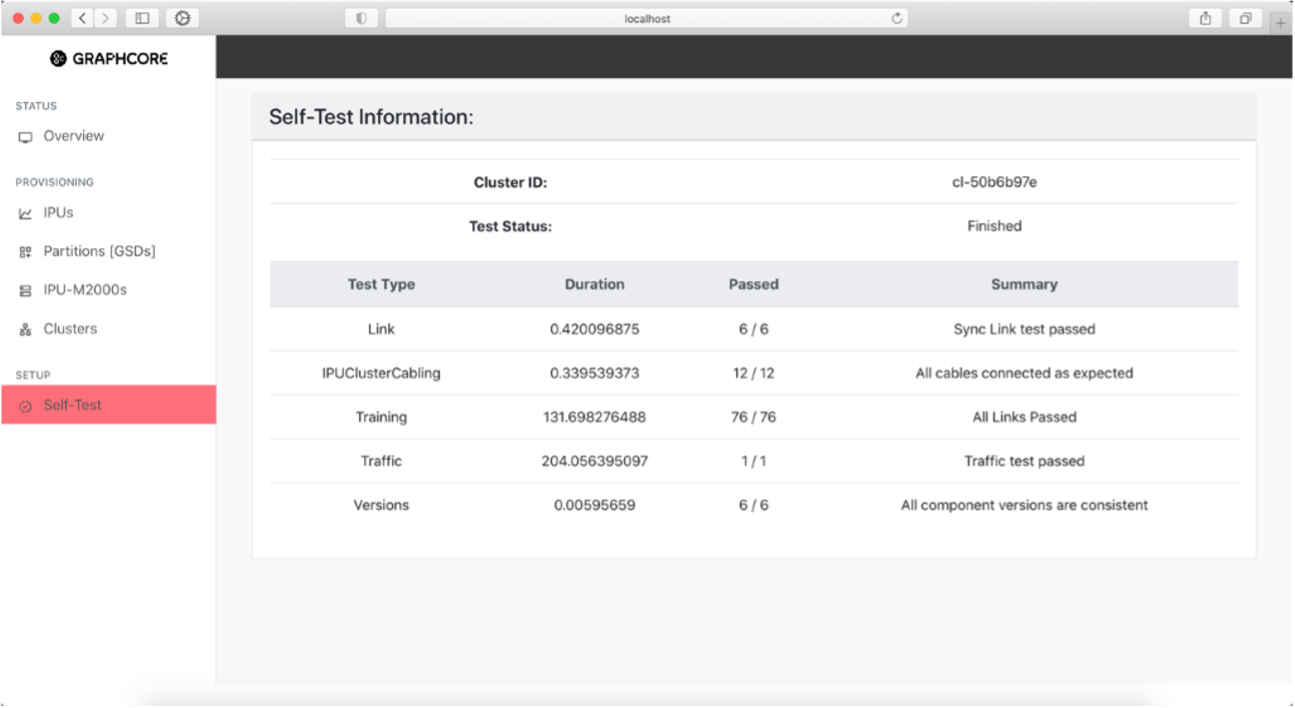
Fig. 35 Self-test results